
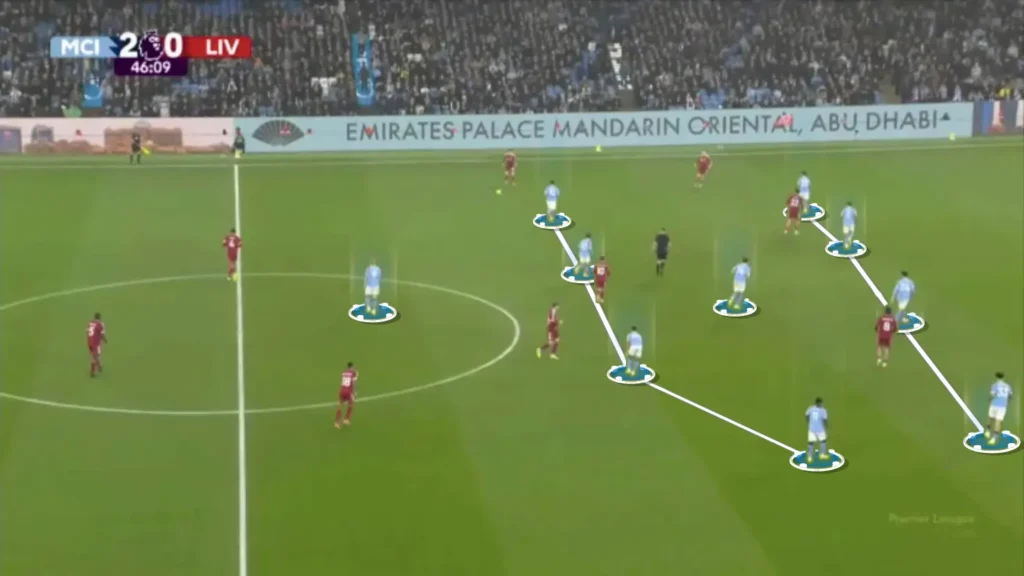
The 4-1-4-1 is one of the most balanced defensive structures in modern football, combining central compactness with strong horizontal coverage and the mobility to step forward into pressure without losing shape. It is built around control – controlling distances between lines, controlling central access, and controlling where the opponent is allowed to play. In an era where teams constantly try to dominate the half-spaces, the 4-1-4-1 offers a reliable framework to shut down central progression while remaining stable in wide channels.
Why Teams Use the 4-1-4-1
The shape provides natural coverage across the pitch. The back four protect the space behind, the pivot shields the most dangerous central pockets, and the midfield four manage the width and block vertical passes. Unlike a 4-4-2, it provides an extra layer inside the midfield; unlike a 5-4-1, it keeps more players available to press and counterattack.
This makes it ideal for teams who want to stay compact without sinking too deep, and who want to defend proactively while maintaining a disciplined mid-block. The lines remain narrow to protect the central lane, but they can widen quickly when the ball goes toward the touchline. This lateral shifting is supported by short vertical distances between the striker, the midfield line, the pivot, and the back four, which makes the structure harder to break with passes between the lines.
Roles Within the 4-1-4-1 Formation
The Striker
The striker controls direction rather than intensity. He shapes the opponent’s build-up by blocking central access and forcing play toward one side. Because he is alone, he must press with curved runs, encouraging the opponent to play into predictable areas where the team can press and win the ball.
The Midfield Four
These players define the identity of this structure. They maintain horizontal compactness, block central passing lanes, and adjust continuously to protect the half-spaces. The wide midfielders track wide movements while still pinching inside when needed; the two No. 8s screen passing lanes into advanced midfielders and help secure the second balls.
The Pivot (No. 6)
The pivot plays a crucial role. He:
- Protects the central pocket behind the midfield
- Supports the center-backs when they step forward
- Closes pockets that appear when a No. 8 presses higher
- Protects Zone 14
- Tracks attackers in the half-spaces
- Helps fullbacks when opposition wingers move inside
Without correct positioning from the pivot, the structure collapses, and his presence allows the midfield line to jump forward or shift wide without risking large gaps behind them.
The Back Four
The backline must stay compact and coordinated:
- Center-backs step forward when attackers receive between the lines.
- Fullbacks engage wide players when they have cover inside.
- The entire line shifts laterally to protect gaps and maintain spacing.
They generally remain narrow to protect the half-spaces. However, they can step out and defend more aggressively when needed because the midfield — particularly the pivot — is positioned to cover the space they leave behind.
How the 4-1-4-1 Matches Different Opposition Structures
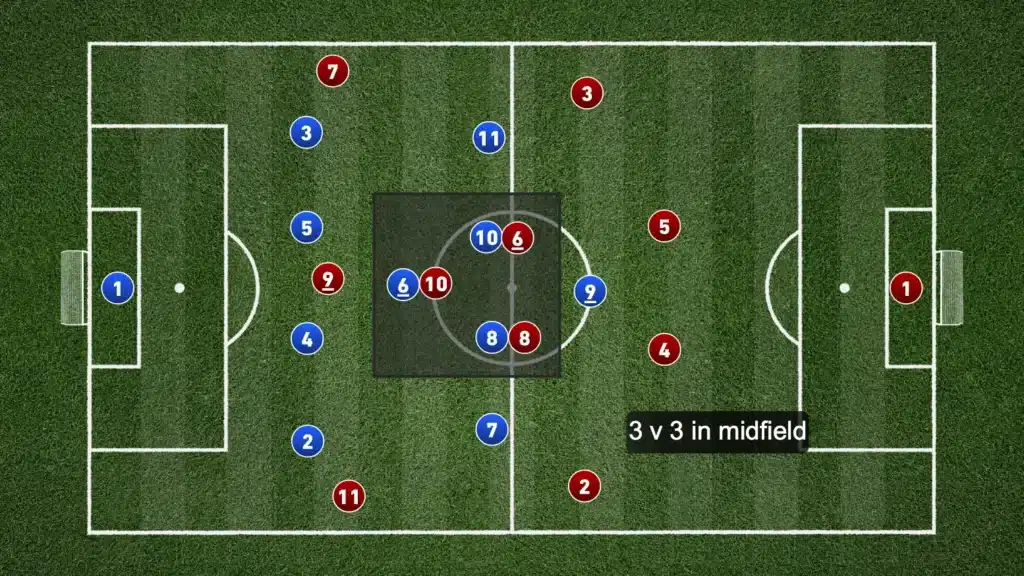
Against Three Central Midfielders
The two No. 8s and the pivot create a natural 3v3 in the middle. This prevents opponents from progressing through the middle and keeps the central channel protected. Each midfielder has a clear defensive reference point, reducing freedom for the opposition’s interior players.
Against Two Central Midfielders
With a 3v2 in midfield, one midfielder is always free to help defend wide, track inverted wingers, or drop toward the center-backs when facing a front two. The shape handles both central and wide threats efficiently without requiring major structural adjustments.

This ability to control both interior and exterior spaces is one of the main reasons coaches trust the 4-1-4-1.
Strong at Defending the Flanks
Defending wide areas is one of the natural strengths of the 4-1-4-1. The shape places two wide players on each side – a wide midfielder and a fullback – which means the first defender can press the ball, the second can cover behind, and both can adjust based on whether the opponent plays inside or outside.
Here’s why it works so well:
- Immediate Width in the Midfield Line
The wide midfielders are already positioned near the touchline, so they can close down the fullback or winger quickly without stretching the block. - Layered Support From Midfield
The ball-side No. 8 shifts outward to block the inside channel, preventing combinations into the half-space. This denies the opponent the ability to isolate the fullback or create simple 2v1 overloads. - High-Level Protection From the Pivot
The pivot slides across to seal the inside lane, forcing attackers to stay wide rather than cut inside. This makes wide attacks predictable and easier to contain.
Together, these mechanisms create a defensive situation where four players can influence the wide duel: the wide midfielder, the fullback, the near No. 8, and the pivot. This layered support makes it extremely difficult for opponents to create effective overloads on the wings.
Supports Aggressive Pressing and Counterattacks
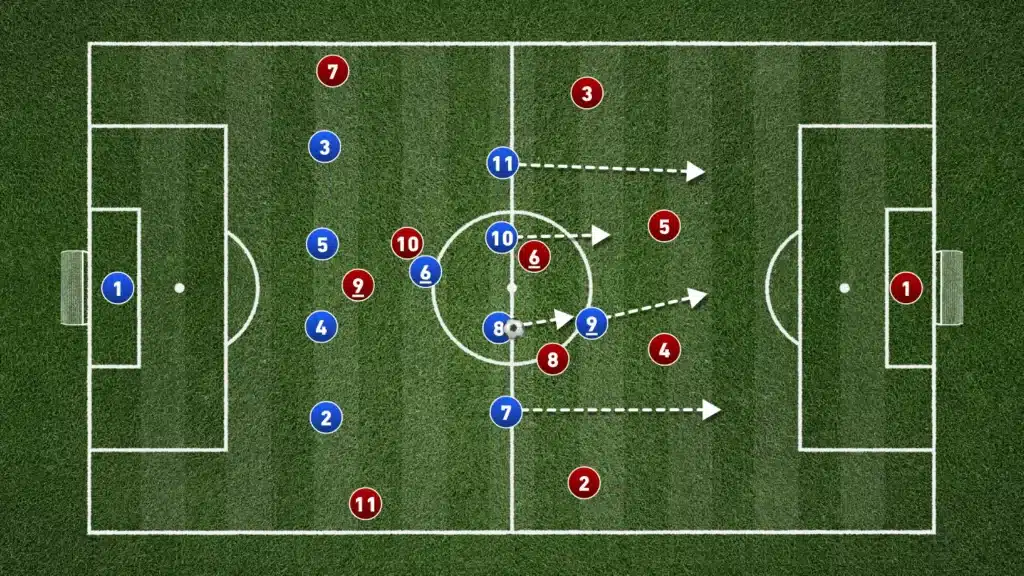
A key advantage of the 4-1-4-1 is its ability to press aggressively despite being a compact mid-block system. With four midfielders positioned high and close to the front line, the team naturally has many players in areas where they can step forward and pressure the opponent early.
The wingers can jump onto fullbacks or wide center-backs to support the striker, preventing the opponent from circulating the ball easily across the backline. The No. 8s can also break out of the shape to close down pivots or help press defenders. Because the eights start higher than in a deeper block, they can arrive with intensity and help the team trap the opponent on one side.
The structure also places several players high enough to form dangerous counterattacks immediately after regaining the ball. With the striker, both wingers, and the No. 8s already advanced, the team can transition quickly and attack the spaces left behind the opponent’s defensive line.
This balance — compact defending combined with high pressing potential and strong counterattacking presence — is one of the main reasons the 4-1-4-1 remains a popular defensive system.
The Defensive Midfielder’s Challenge Across the Half-Spaces
One key advantage of the 4-1-4-1 is that the pivot can support wide areas by covering underlaps and half-space runs. His starting position makes him well-placed to block interior movements and protect the fullback.
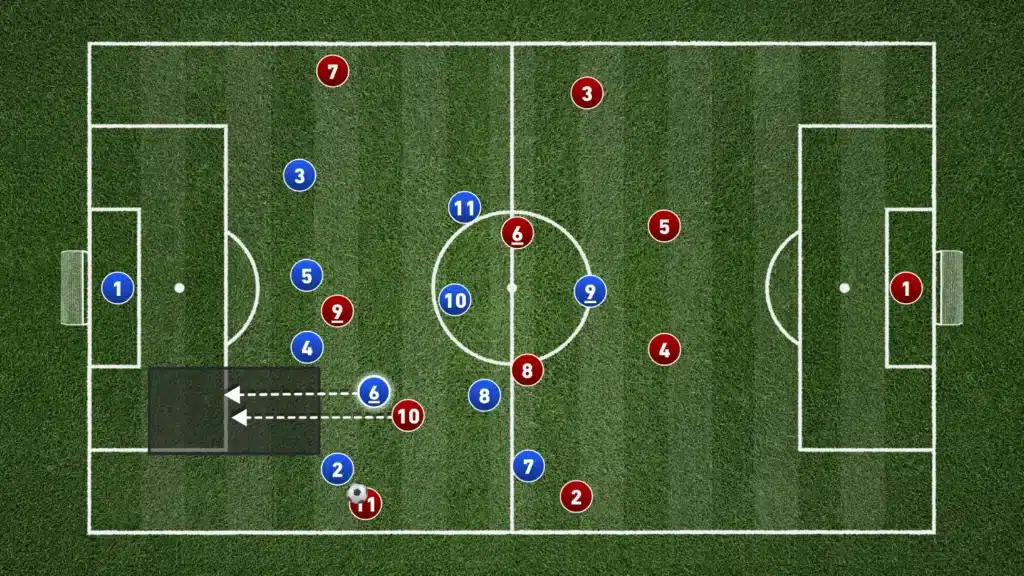
However, this responsibility becomes very demanding when it must be repeated across both sides of the pitch. Because the pivot starts centrally, covering from one side to the other requires long-distance sprints. If the opponent switches play quickly, the pivot often cannot arrive in time to prevent immediate danger on the far side.

Over the full match, these repeated lateral shifts can stretch his capacity and temporarily expose the half-spaces simply due to the distance he must cover. Therefore, when the opposition has the ball out wide, it becomes crucial for the team to prevent the switch of play and keep the opposition wide, or to at least slow it down to buy the pivot time to recover his position.
The Lone Striker Problem
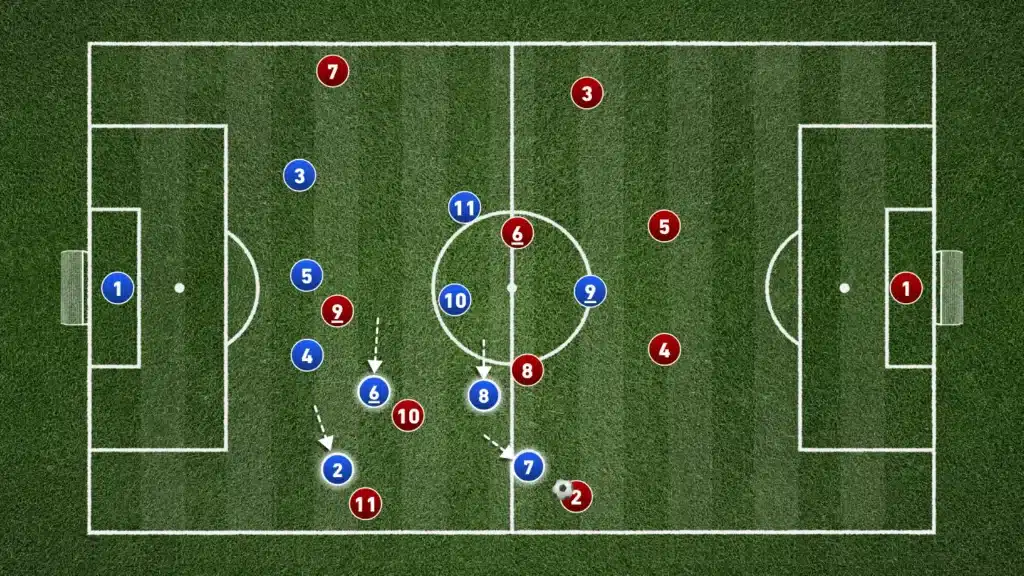
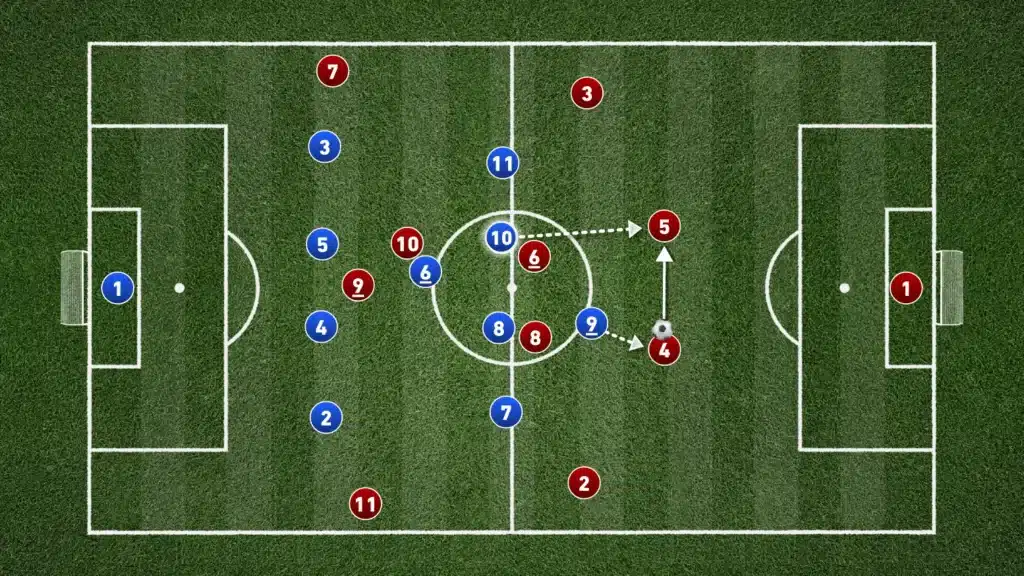
A natural limitation of the 4-1-4-1 is that the first line of pressure consists of only one striker. This means the opponent will always have a free defender in their first line of build-up. When the striker presses one center-back, the ball is simply moved across to the other, and unless the team reacts quickly and in sync, that defender can advance and break the first line.
To prevent the center-back from advancing too far, one of the No. 8s often has to push out of the midfield line and press him directly. Once the No. 8 steps forward, the pivot must immediately shift upward to cover the pocket of space that opens behind him.
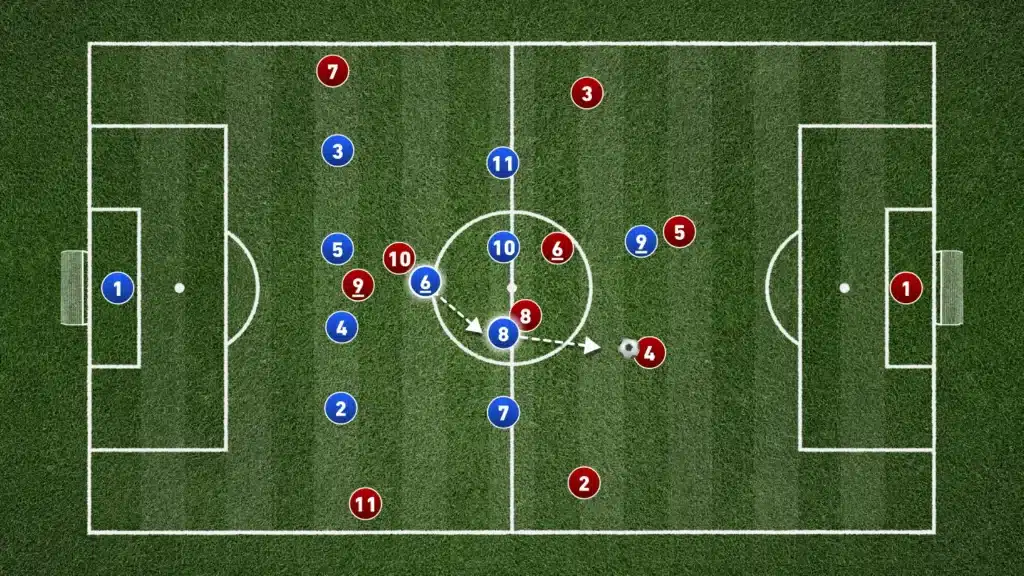
When this reaction is coordinated and timed perfectly, the structure maintains its compactness and keeps central access closed. When the movements are late or poorly synchronized, the opponent can play into the exposed central spaces and bypass the midfield line. Managing this dynamic is a built-in challenge of the system and requires clear coaching and consistent repetition.
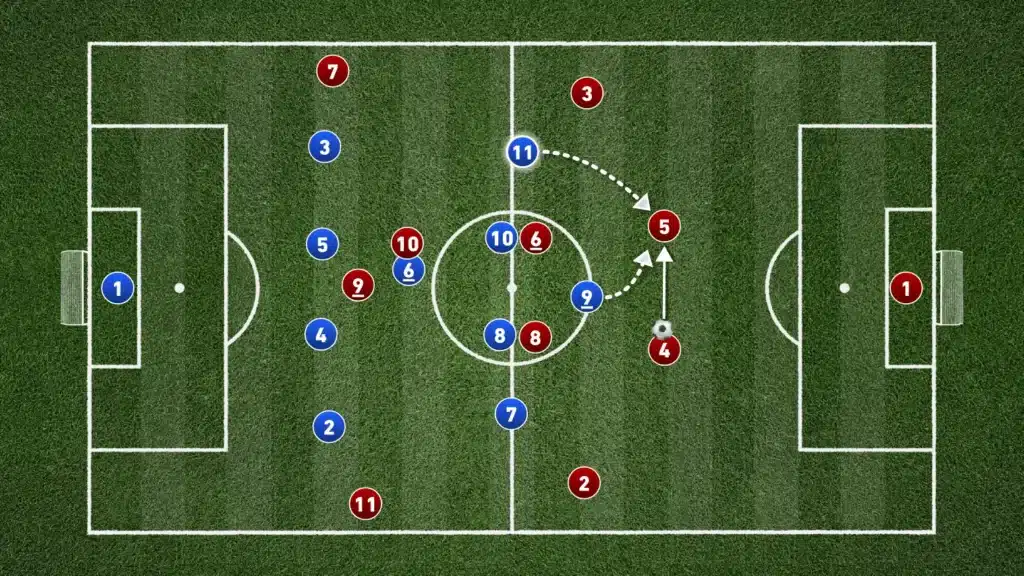
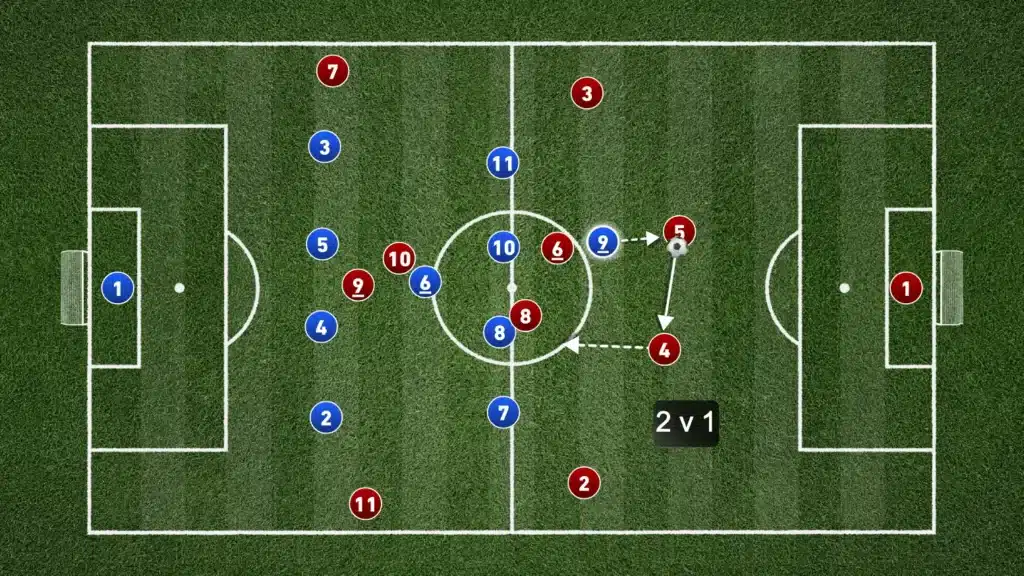
Facing Teams With Five Attackers on the Last Line
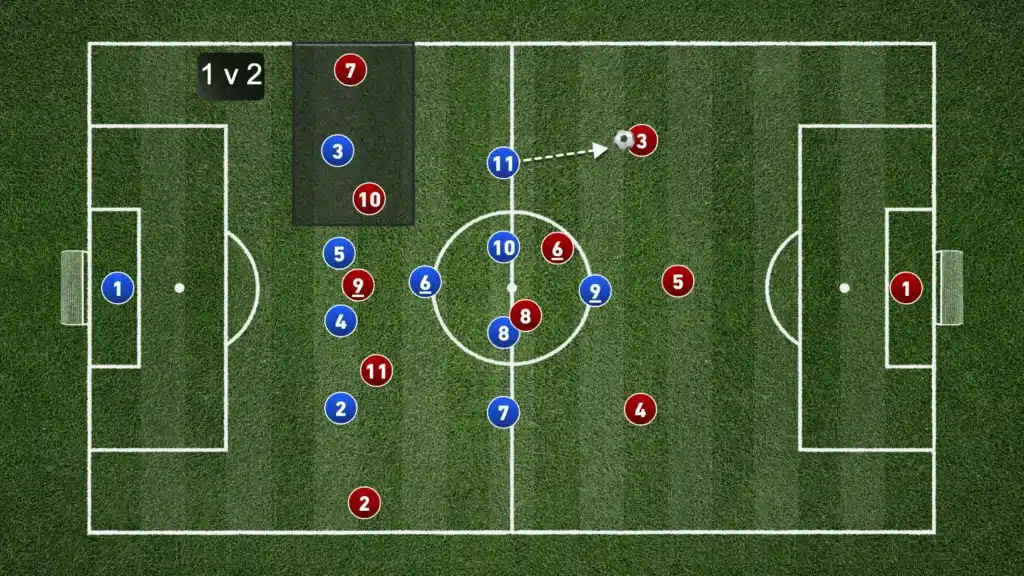
The system becomes more stressed when opponents use five players on the last line, for example, in a 3-2-5 system. When the ball reaches an opposition wide center-back, the wide midfielder must jump outward to confront the ball-carrier. This leaves the fullback in a 1v2 against the winger and the inside forward.
There are two main solutions:
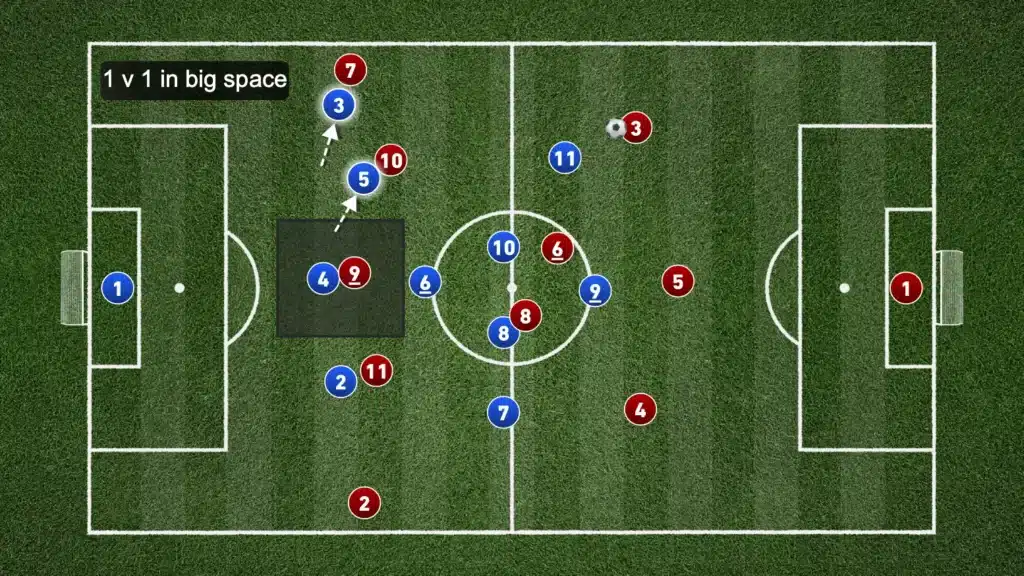
Center-back support – The nearest central defender shifts wide to pick up the inside forward, while the fullback takes the winger. This can stabilize the wide duel but opens a dangerous gap in the center, leaving the remaining center-back isolated in a 1v1 against the striker.
Holding midfielder cover – Alternatively, the holding midfielder slides across to mark the inside forward, leaving the back four intact.
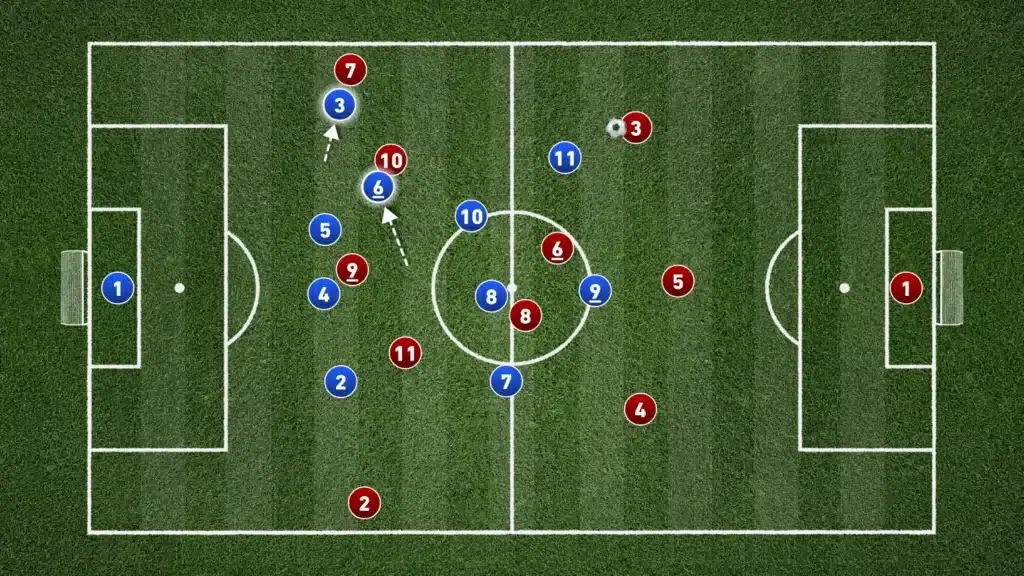
This avoids exposing the central defenders but creates a different problem, the same one that came before: when possession is recycled and switched quickly across the backline, the holding midfielder must sprint to cover the other side. Over 90 minutes, this is physically exhausting and difficult to sustain.

Conclusion
The 4-1-4-1 is one of the most complete defensive shapes in modern football: compact, flexible, and tactically stable. Its three central midfielders give it natural control of the interior, while its structured wide defence makes it extremely difficult for opponents to create overloads on the wings. Although the system can be stressed by opponents committing five attackers to the last line, and although the lone-striker issue requires coordinated reactions from the No. 8s and the pivot, a well-coordinated 4-1-4-1 forces opponents into predictable, low-value attacks and protects the most dangerous spaces on the pitch.
It remains a system valued by top coaches like Pep Guardiola and Maurizio Sarri who want to stay compact without retreating deep, press without losing shape, and maintain stability in every phase of defending.
All images and visuals in this article are made with Once Sport — a powerful and easy-to-use tactical analysis platform. It helps you annotate clips, visualize movements, and create professional analysis videos. Readers of The Football Analyst get 10% off plus one month free with the code TFA10 at checkout.