In modern football, pressing is no longer just about chasing the ball. The best teams defend by controlling space, blocking passing lanes, and forcing opponents into predictable routes. One of the most important tools for doing this is the cover shadow — a subtle but powerful concept that shapes how teams press, defend, and manipulate the opposition’s build-up.
This article breaks down what cover shadows are, how they work, why they matter, and how teams use them at every level.
What Is a Cover Shadow?
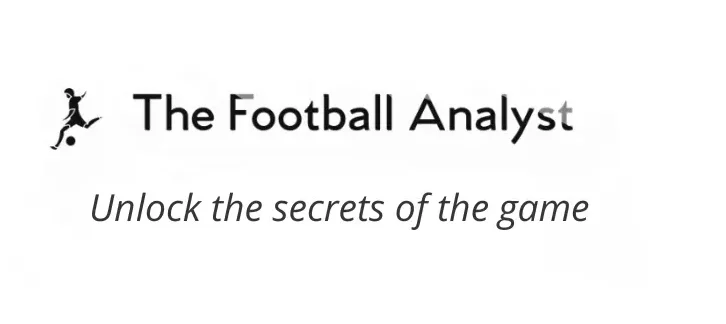
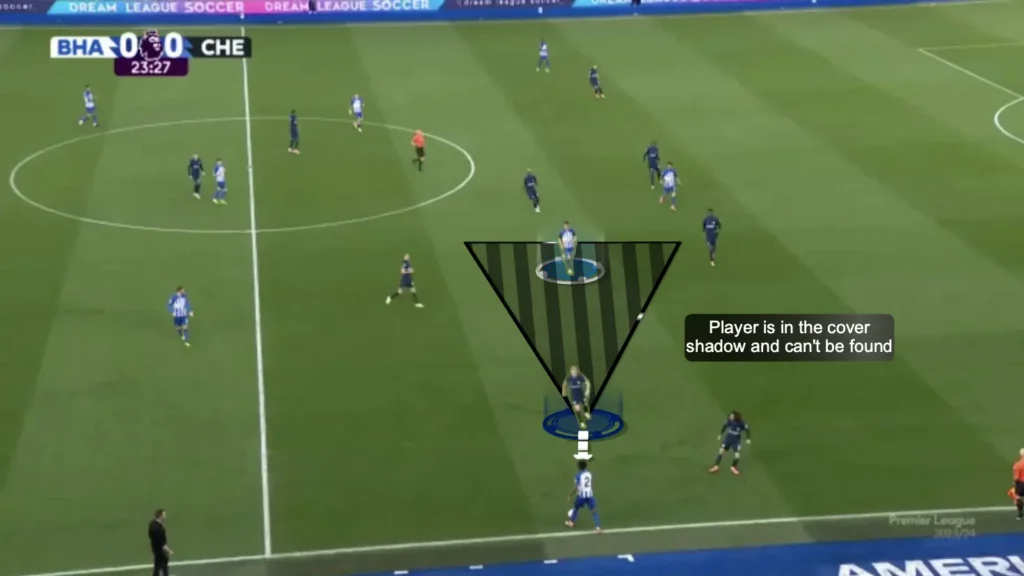
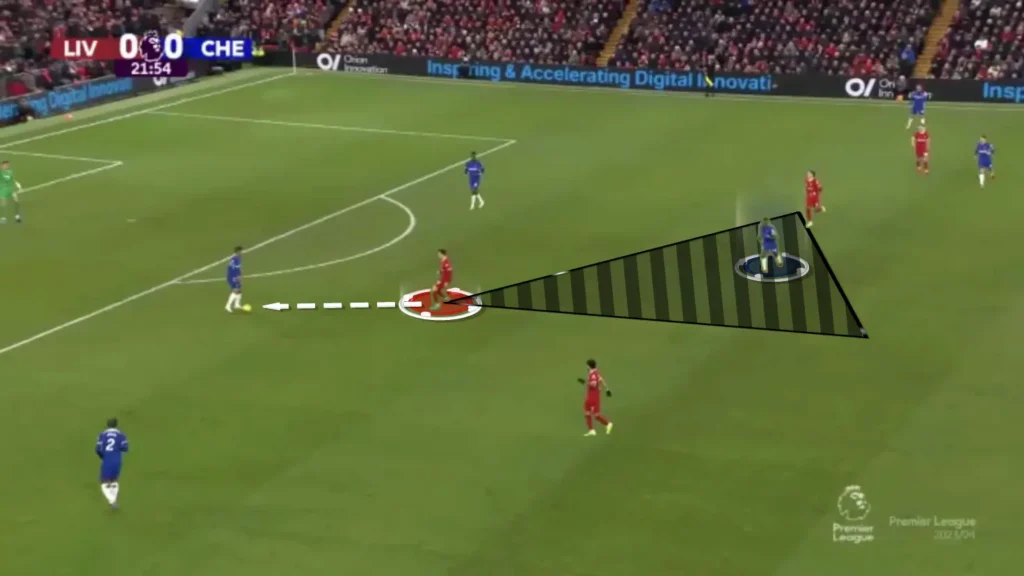
A cover shadow is the area behind a pressing player that becomes “blocked” from the ball-carrier’s view. When a defender presses, their body position prevents the opponent from passing to the player behind them.
It’s a way of defending two players at once:
- Press the ball-carrier
- Block the passing lane to a second opponent
- Force play into a predictable direction
A well-used cover shadow reduces available options without needing extra defenders. Instead of marking every opponent individually, a team can remove options simply through angle and positioning.
Why Cover Shadows Matter
Modern build-up relies on accessing midfielders between the lines, finding free players behind pressure, and progressing centrally. Cover shadows are the countermeasure.
A strong cover-shadow structure:
- Prevents passes into midfield
- Forces opponents wide
- Triggers pressing traps
- Creates numerical superiority around the ball
- Saves energy by removing options without requiring more running
Teams that use cover shadows well don’t just defend space — they manipulate where the opposition must play.
Key Principles of Effective Cover Shadow Use
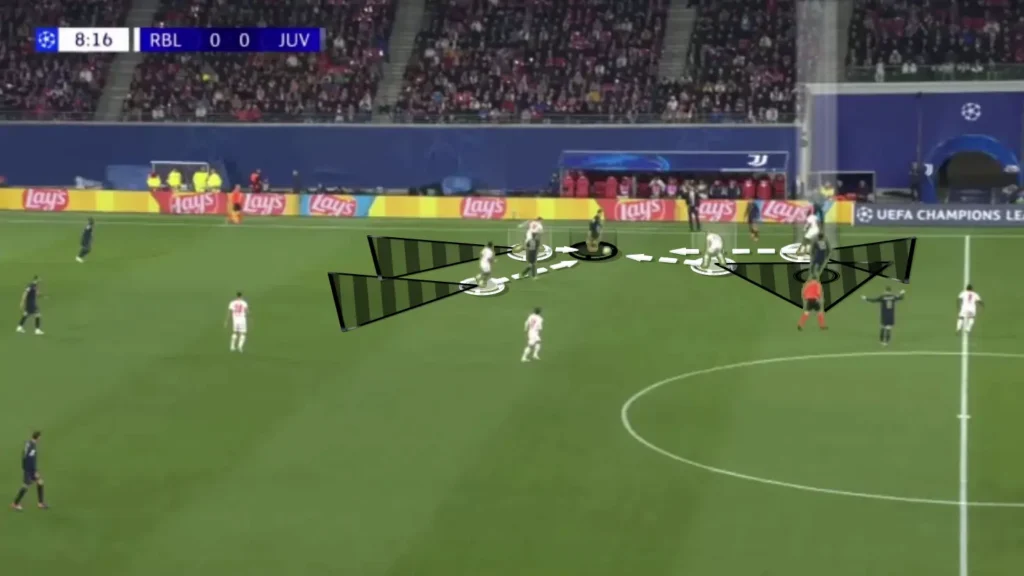
1. Pressing With an Angle
Running straight at the ball-carrier rarely blocks passing lanes effectively. Pressing diagonally forces the opponent one way while covering the inside option. For example, a winger pressing a fullback from inside-out can block a pass into midfield, while a striker curving toward the pivot steers play to a center-back. Angled runs generally create a larger and more effective shadow than running straight at the opponent.
2. Body Orientation
How a player positions their body determines which lanes are blocked. Turning slightly inward can stop passes to a pivot, while opening outward can block the route to a fullback. Even small adjustments can have a major effect when combined with teammate movements.
3. Distance Between Lines
Cover shadows work best when the team is compact. Too much space between lines allows opponents to find angles and bypass the press. Close distances make shadows stronger and harder to play around.
4. Team Synchronization
A cover shadow only works if teammates move in harmony. If a winger presses inside-out but the midfielder behind does not adjust, the opponent can still escape. Effective shadows rely on collective movement, not individual effort alone.
Common Situations Where Cover Shadows Are Used
Pressing the First Line
The striker positions his body to block the pivot with his cover shadow while pressing the center-back. This narrows the opponent’s options and funnels play toward one side, allowing the pressing team to “steer” the build-up into a predetermined trap.
Blocking the Half-Spaces
Midfielders often press diagonally so their cover shadows block passes into attacking midfielders between the lines. This shuts off the most valuable interior lanes and forces the opponent to circulate the ball wider or deeper.
Pressing Fullbacks
Wingers approach fullbacks from an angle that blocks inward passes into midfield. The fullback is pushed toward the touchline, which acts as an extra defender and limits escape routes. This type of shadow-based pressing is key to trapping opponents on the wing and preventing switches of play.

Controlling Zone 14
A number six will often step forward to press the ball while using their cover shadow to block the central attacking midfielder behind them. This allows one player to protect Zone 14 — the most dangerous part of the pitch — while still applying pressure. Instead of committing multiple players to defend the same threat, the cover shadow handles the marking responsibility.

Counterpressing After Loss
Right after losing the ball, players press aggressively while using their cover shadows to block outward passing lanes. This prevents the opponent from playing forward into midfield and traps them near the loss of possession. By shutting off immediate escape routes with their shadows, the pressing team can swarm the ball-carrier and often regain possession within seconds.
Cover Shadows in Build-Up: The Other Side of the Duel
Attackers must understand cover shadows just as much as defenders.
When trying to receive between the lines, players must constantly adjust:
- Move out of the shadow
- Drop or drift to create a new passing angle
- Rotate with a teammate to unbalance the defender
Good attacking midfielders survive by staying a few centimeters away from the shadow — enough to be visible and playable.
Using Third-Man Combinations to Escape Cover Shadows
A common problem in build-up: the intended receiver has space, but the pass is impossible because a defender’s cover shadow blocks the lane.
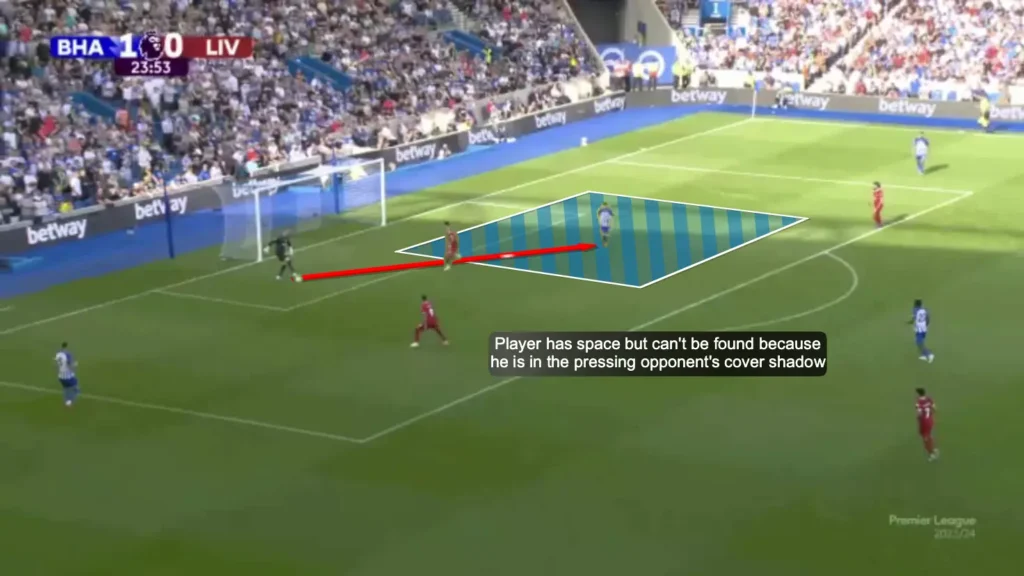
The solution is a third-man combination that changes the geometry of the pass rather than the position of the receiver.
Mechanics in three steps:
- Attract the pressure. The ball-carrier invites the opponent to step, opening the space behind the presser for the teammate.
- Third man presents and receives. That second player positions slightly off the direct line, receives, and immediately plays with the required angle.
- The final pass finds the open receiver. Because the third man moved and re-oriented the ball, the pass now arrives at a new angle that avoids the cover shadow.
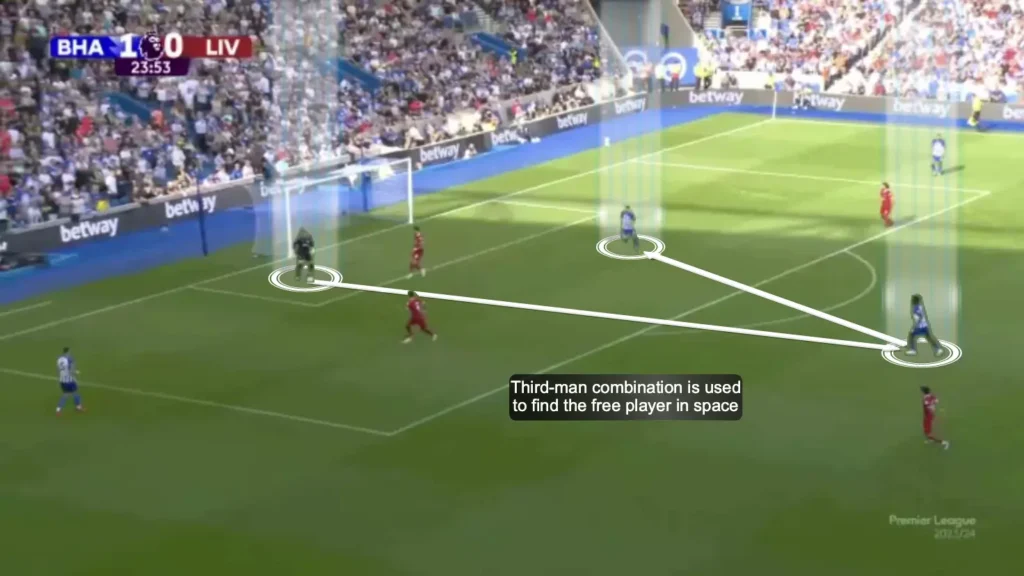
The receiver — who already had space but was invisible to the passer — suddenly becomes playable because the pass no longer travels through the defender’s shadow.
Conclusion
Cover shadows are one of the most important — yet subtle — aspects of modern defending. They allow teams to press with intelligence, control central spaces, and dictate where the opponent plays even before the press arrives.
Used well, a cover shadow can control two opponents at once, strengthen pressing traps, support counterpressing, and protect the most dangerous zones on the pitch.
They are not just defensive details. They are strategic tools that shape how entire teams defend.
All images and visuals in this article are made with Once Sport — a powerful and easy-to-use tactical analysis platform. It helps you annotate clips, visualize movements, and create professional analysis videos. Readers of The Football Analyst get 10% off plus one month free with the code TFA10 at checkout.