
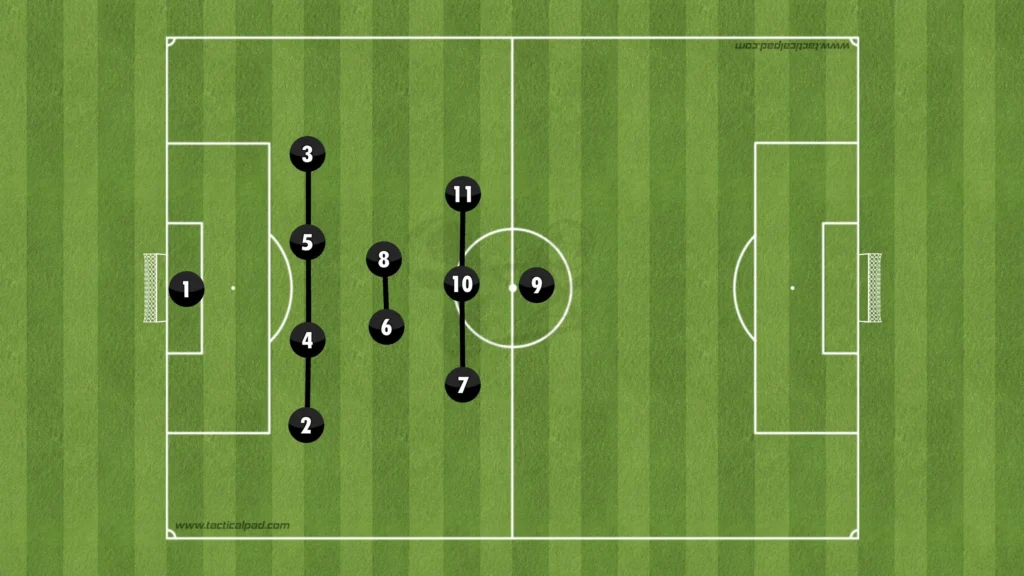
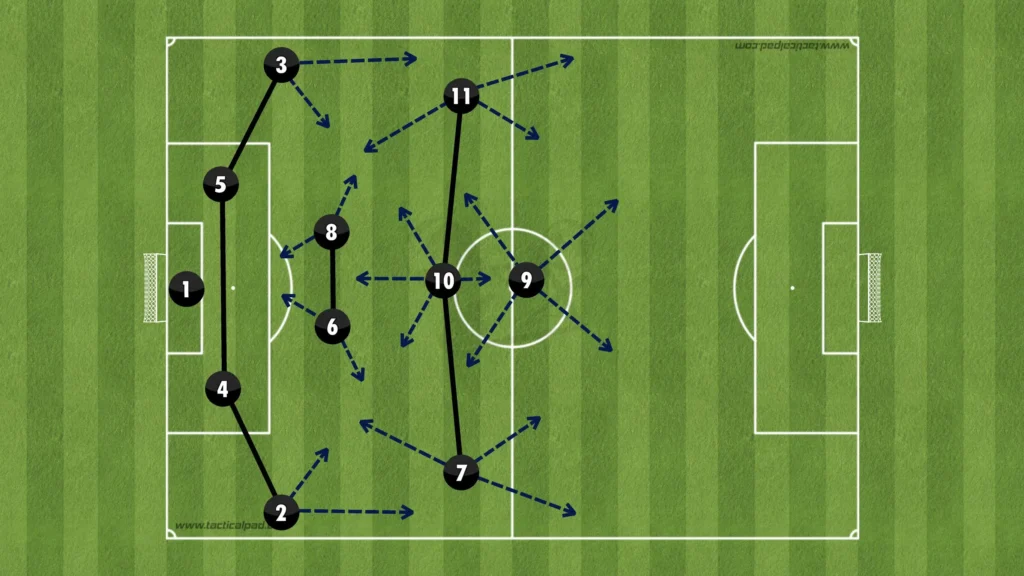
In football, formations play a crucial role in defining a team’s style of play and strategy on the pitch. One of the most popular and versatile formations in modern football is the 1-4-2-3-1. This formation offers a balanced approach, providing both defensive solidity and attacking flexibility. In this article, we will break down the 1-4-2-3-1 formation, exploring its structure, key roles, and the tactical advantages it offers to teams employing it. Whether you’re a player, coach, or avid football fan, understanding the intricacies of the 1-4-2-3-1 formation can enhance your appreciation of the beautiful game.
High Pressing in the 1-4-2-3-1 Formation
When pressing in the 1-4-2-3-1 formation, the main idea is to push the opposition to one side and leave the opposition defenders on the far side open. This is possible because the pass from one side to the other is too difficult for the ball-holder to make, and if he makes it, the players will have enough time to come across and win the ball. The benefit of this system is that it gives you a numerical advantage against the opposition attackers, which gives you more control when defending long balls.
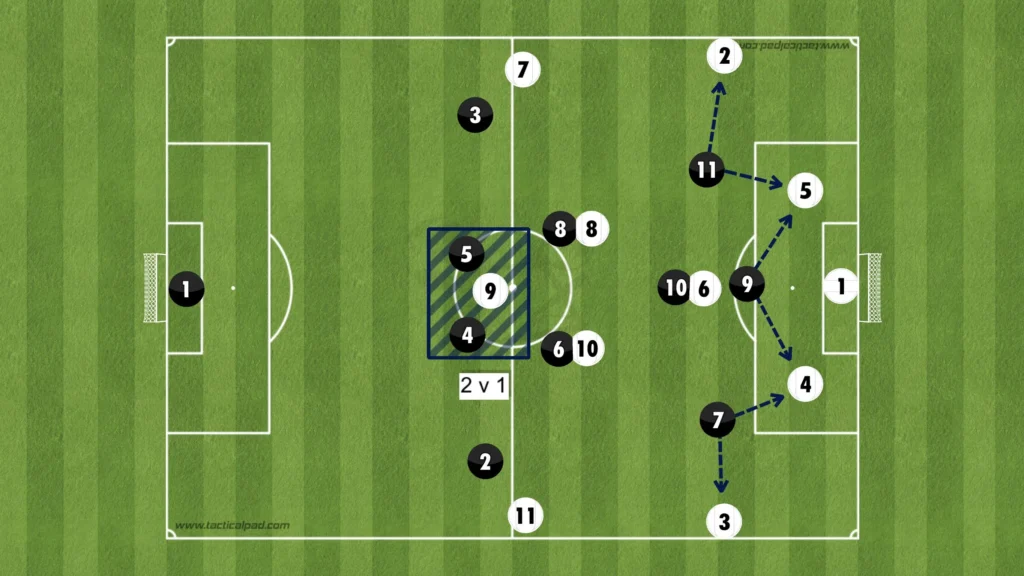
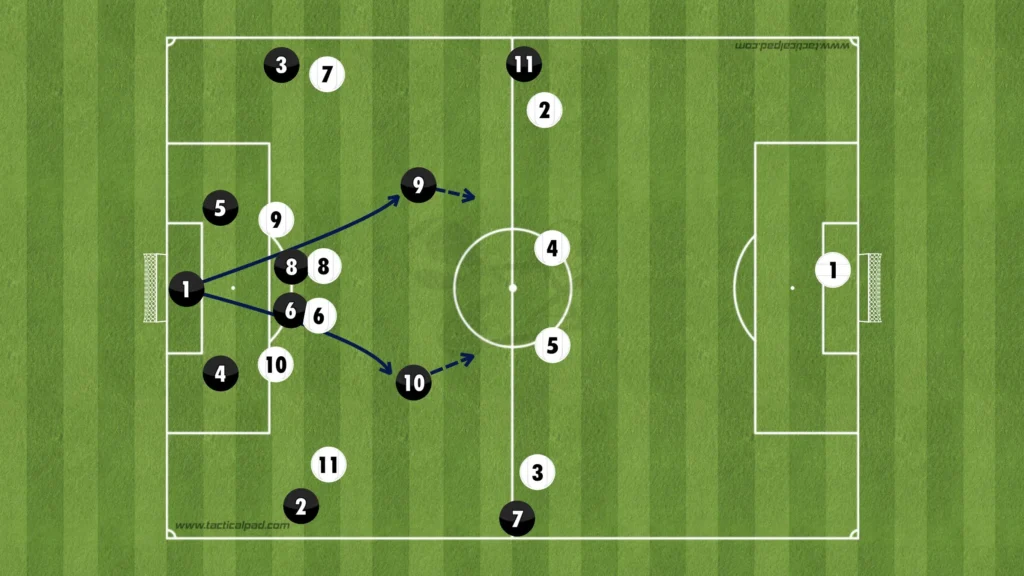
High press against a back four
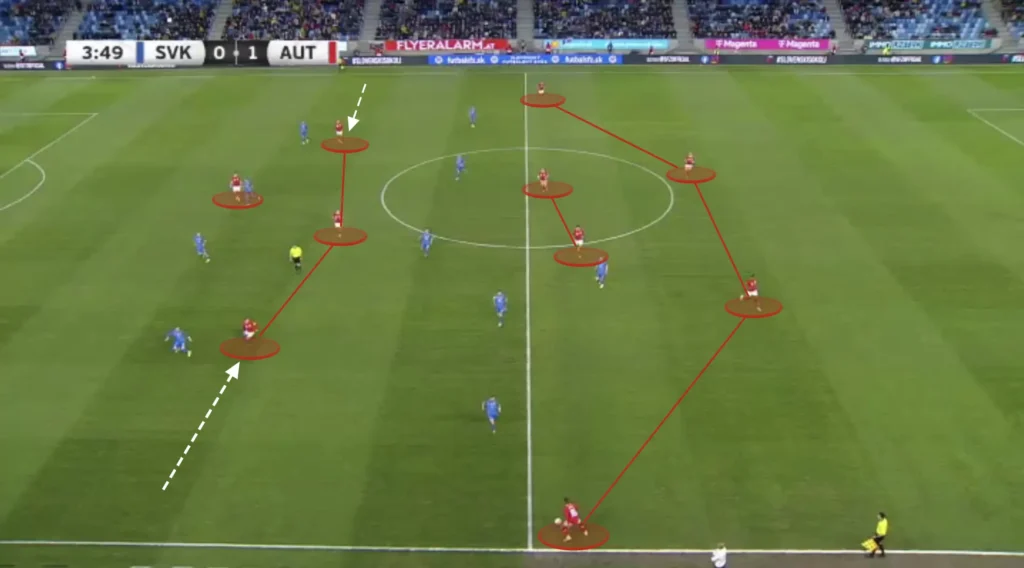
Against a back four, the wingers and striker will be in a numerical disadvantage against the opposition backline, meaning one defender will be open. The three attackers always have to leave the least threatening defender open, usually the defender furthest from the ball. When one of the center-backs gets the ball, the striker could come up and press, the ball-side winger pushes up on the ball-side fullback, and the far-side winger comes up to close the pass to the far-side center-back. Here is how the press would look like against a 1-4-3-3 formation:


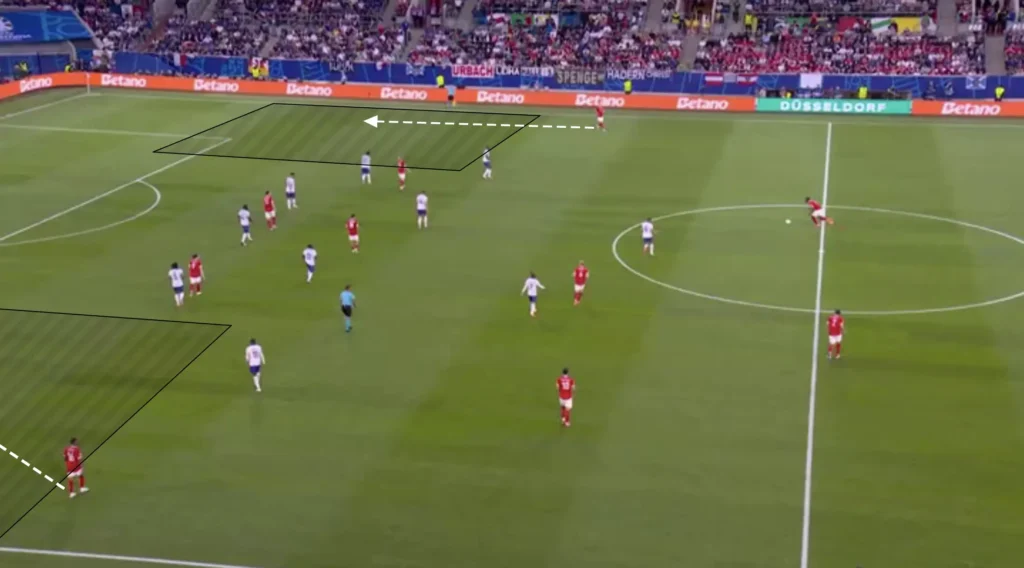
Issues with the switch of play
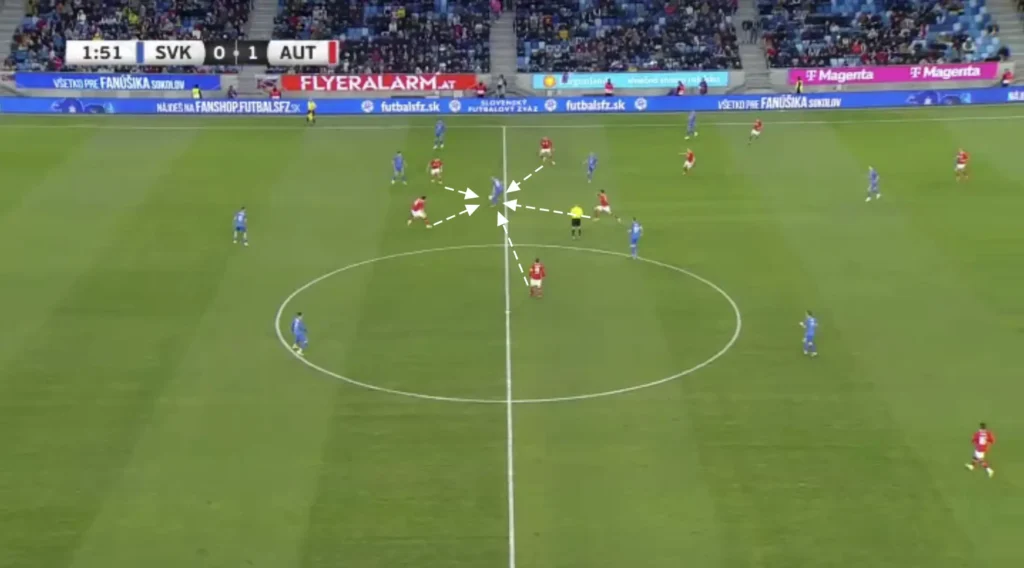
The most important thing when pressing in a 1-4-2-3-1 formation is to close the switch of play. If the opposition switches the ball from one fullback to the other, the winger has to run back too far for the team to keep pressing the opposition. Therefore, the striker has to force the ball to one side and then close the back pass to the center-back. The midfielders also have to be very close to their opponents, not allowing them to turn and switch the play.
If the opposition manages to switch the ball to the far-side fullback, perhaps through a long ball, the defending team can still keep pressing the opposition by pushing up the fullback and coming across with the rest of the backline.
This is, however, only possible if the pass to the opposition far-side fullback is in the air or very slow. If the pass is fast and on the ground, and the fullback can get control of the ball before the defending fullback can push up, the spaces in the backline can be exploited, and goalscoring chances could be created.
High press against a back three
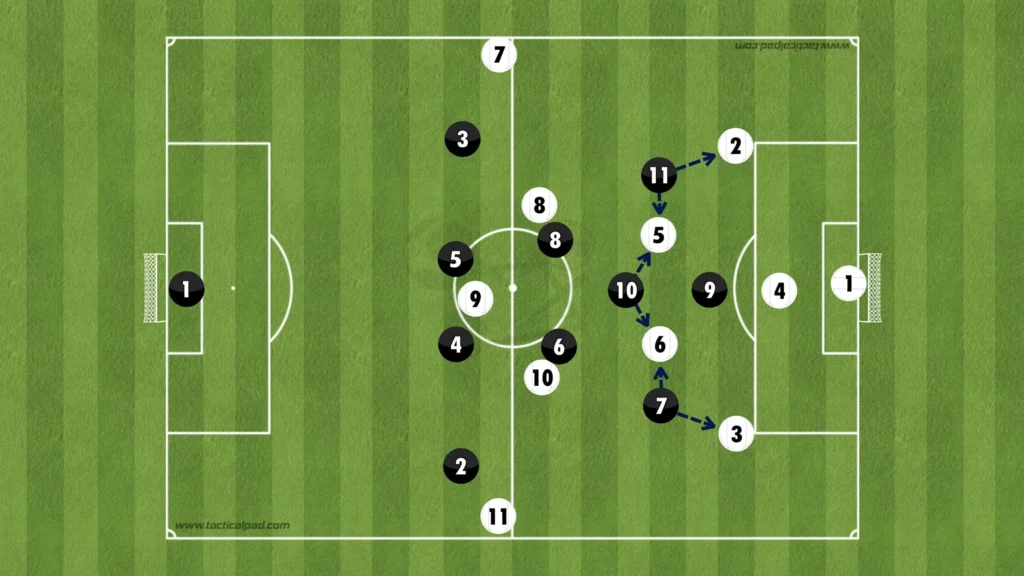
Pressing against a back three works similarly to pressing against a back four. The idea here is again to push the opposition to one side and leave the defender on the other side open. When pressing against a 1-3-4-3 formation for example, the striker will be responsible for the central center-back, the ball-side winger could come up and press the ball-side center-back, the number-ten comes across to the ball-side holding midfielder, and the far-side winger drops back to control the far-side holding midfielder, leaving the far-side center-back open.
Mid/Low Press
Defending in a 1-4-2-3-1 formation revolves around maintaining a compact and organized structure. The formation features a back four that provides stability, with two holding midfielders shielding the defense. These holding midfielders play a crucial role in breaking up opposition attacks and providing cover for the fullbacks when they advance. The three attacking midfielders work to stop entries for the opposition and cut off passing lanes, while the lone striker applies pressure on the ball. The team aims to stay compact, forcing the opposition to play wide and limiting their ability to penetrate through the center. By maintaining this structure, the 1-4-2-3-1 formation helps to control the middle of the pitch, making it difficult for opponents to create scoring opportunities.
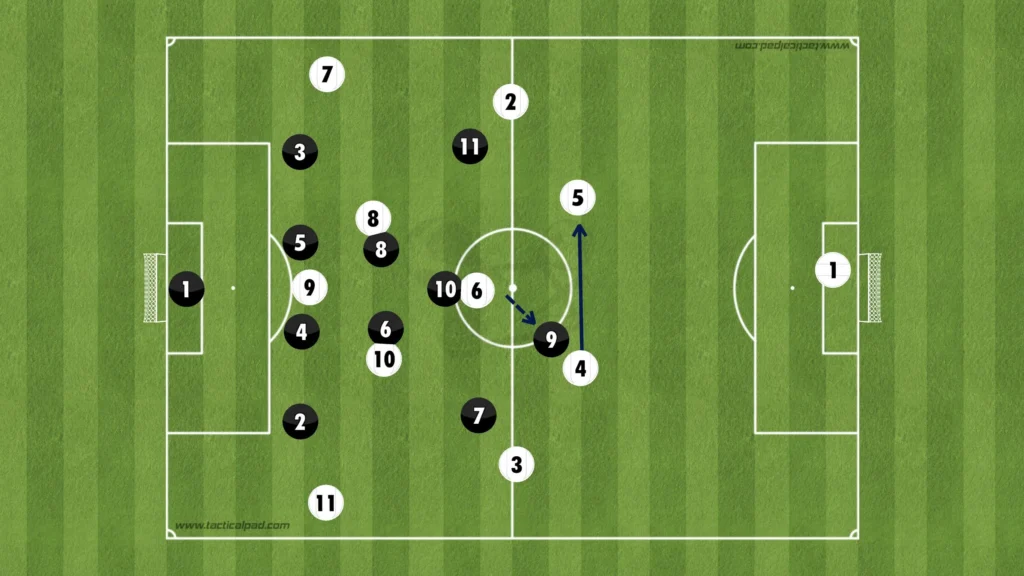
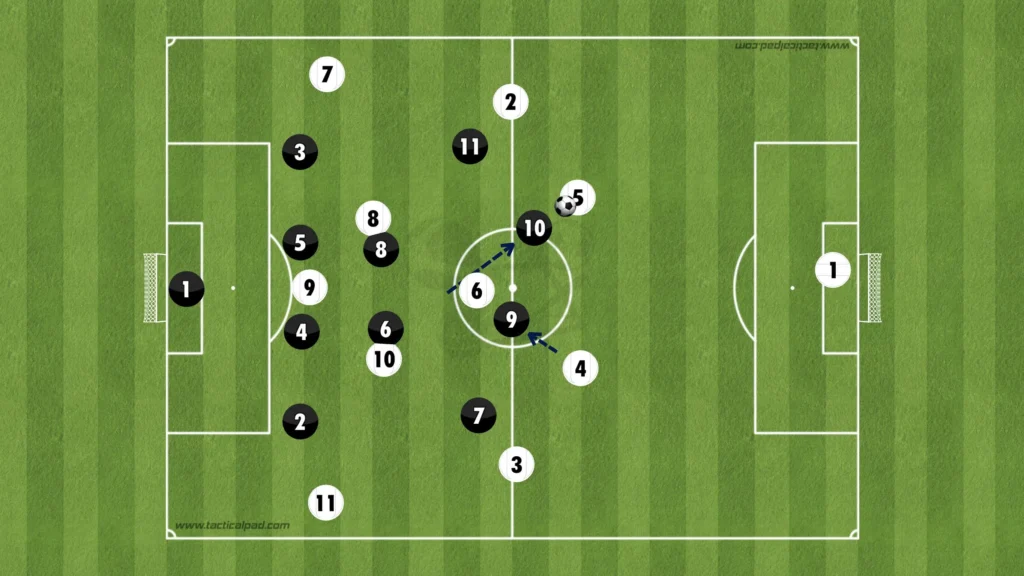
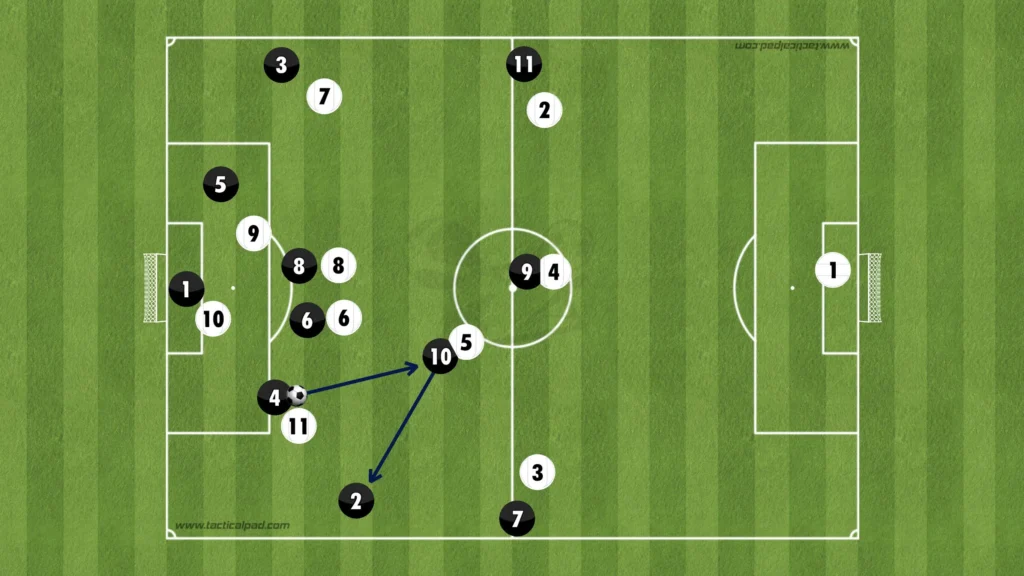
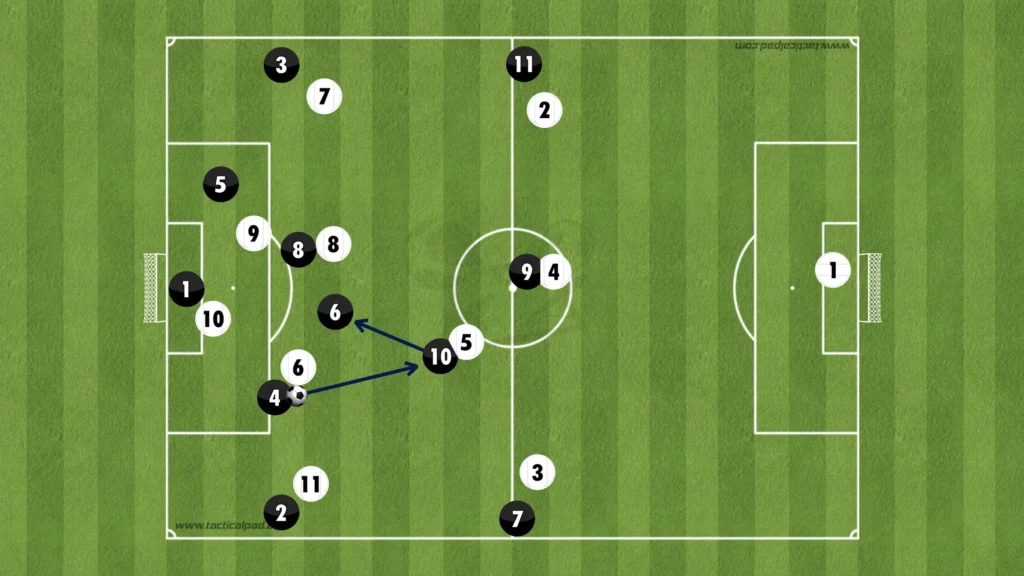
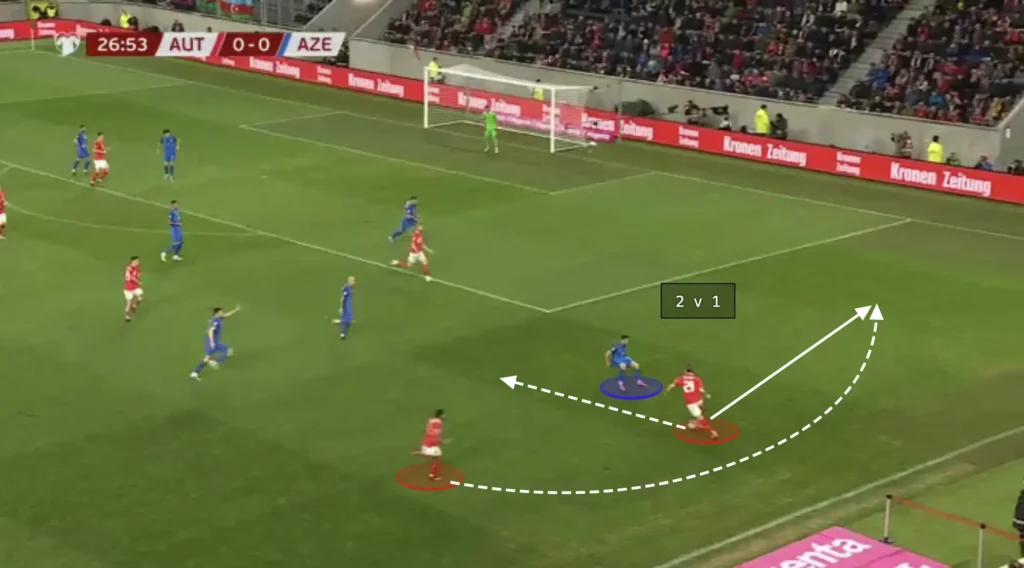
How to deal with center-backs advancing
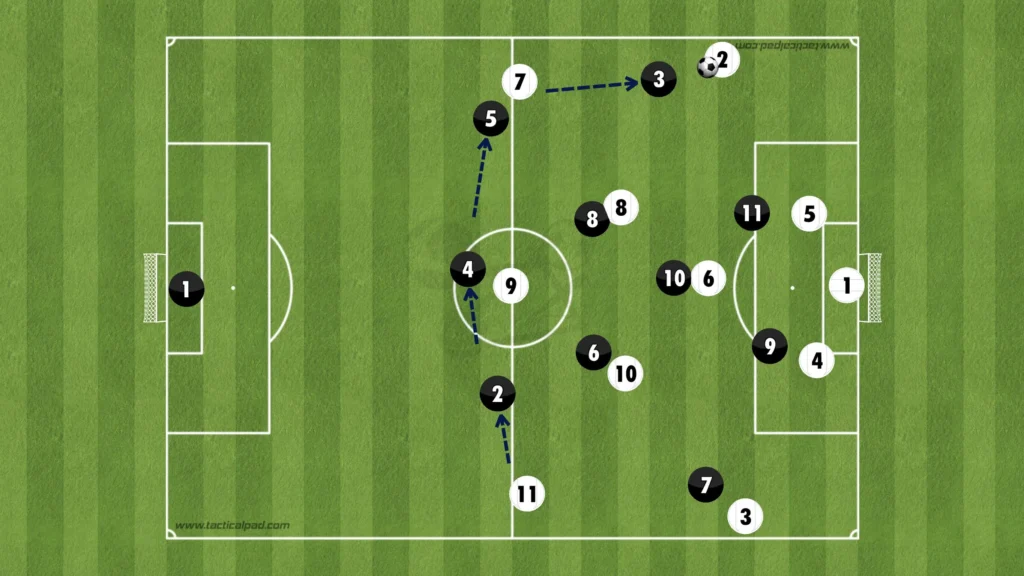
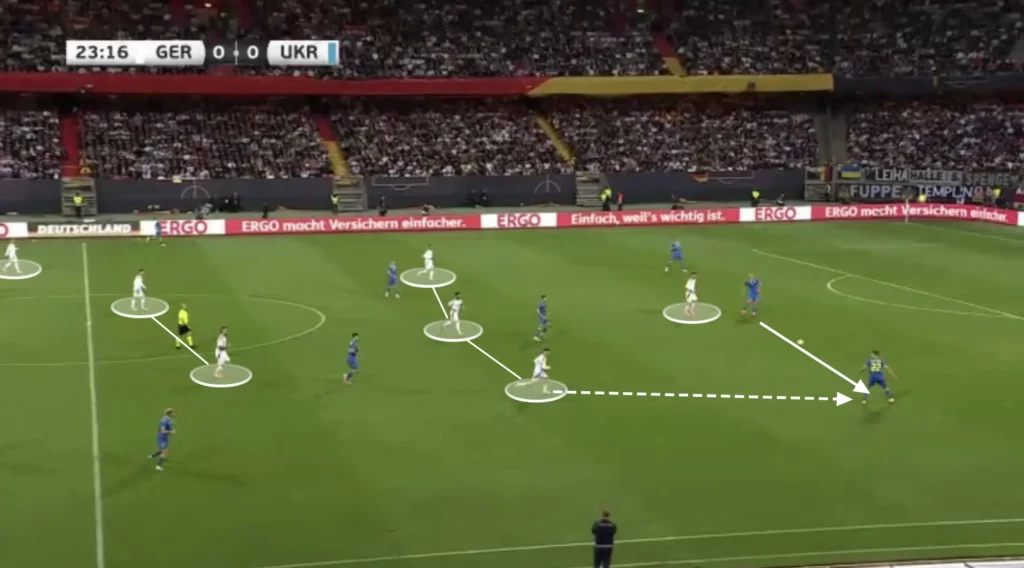
Defending with only one striker means the opposition backline will be in a numerical advantage at the back. When the striker pushes up to press one of the center-backs, the ball can be played to the other center-back, who can take the ball forward. To stop this center-back from advancing too far, the number-ten might have to push up. If the number-ten pushes up, space opens up in the midfield. Therefore, the striker has to come back into the number-tens position to stop the opposition from exploiting this space.
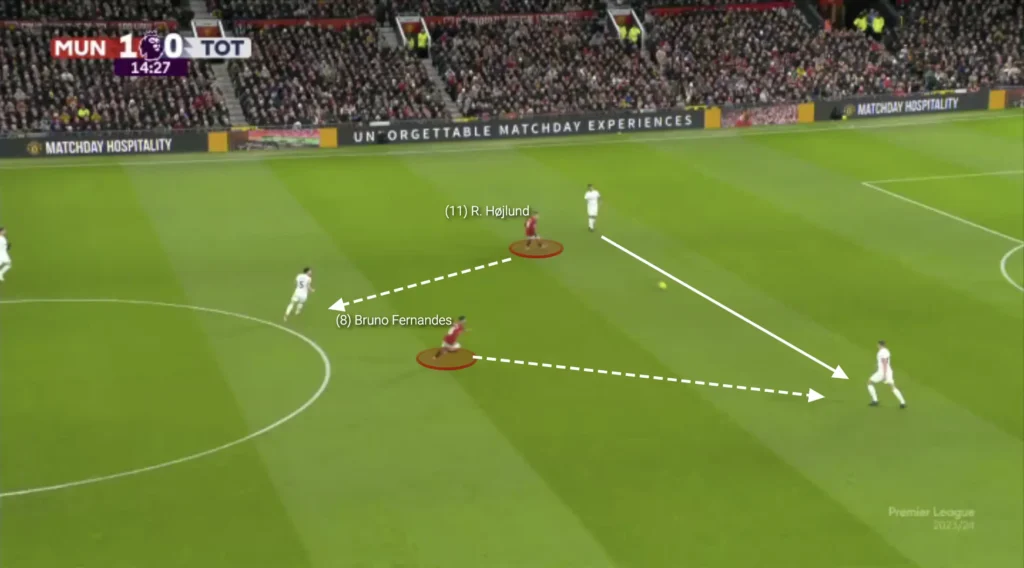
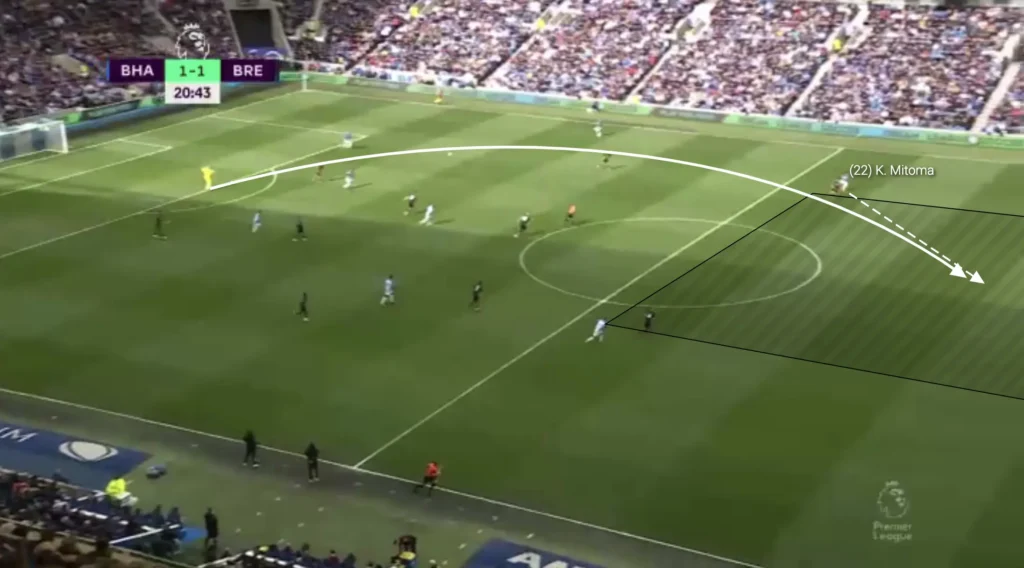
Here, Manchester United use this movement to stop Tottenham from progressing the ball. Højlund pressures the right center-back, forcing him to play the ball to the left center-back. Fernandes breaks out from his number-ten position to press the left center-back. This opens the space for Tottenham’s number-six, forcing Højlund to drop back into the number-ten position.
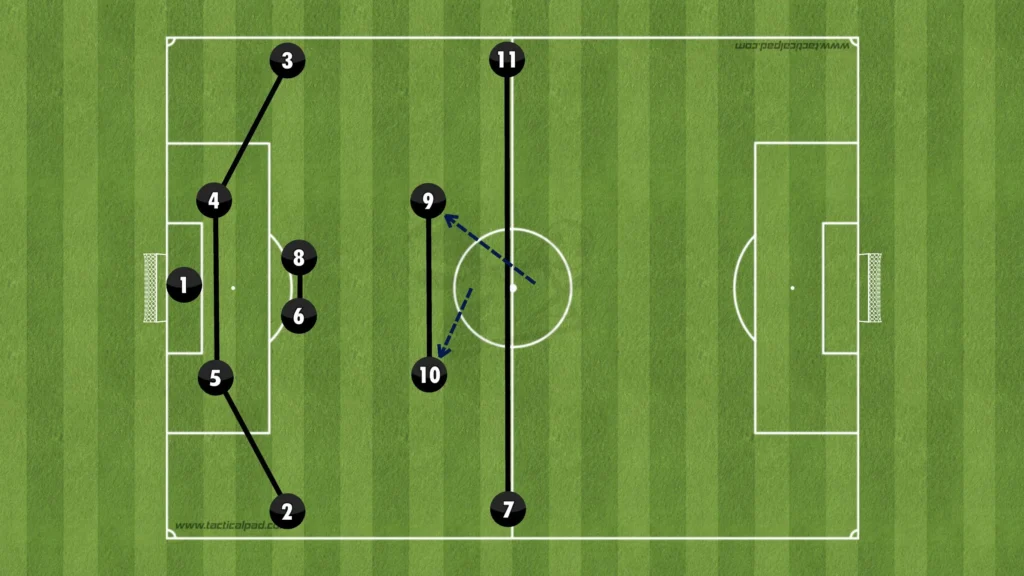
Against a back three, the opposition backline will have a 3v1 numerical advantage against the striker. If the striker gets beat and a wide center-back advances with the ball, the winger has to break out and stop the center-back from advancing. The rest of the team must shift across, staying compact and closing the space the winger opened.
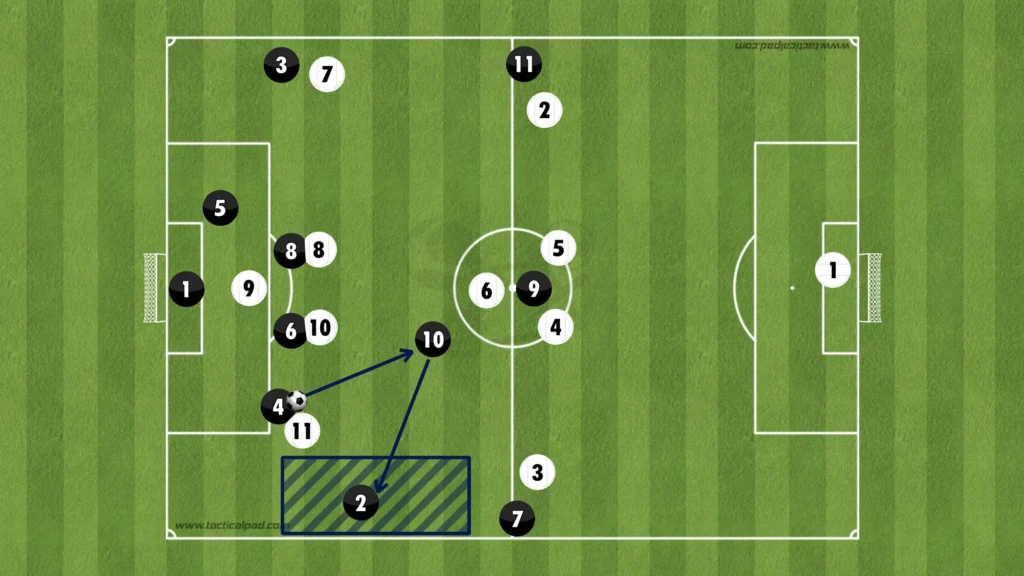
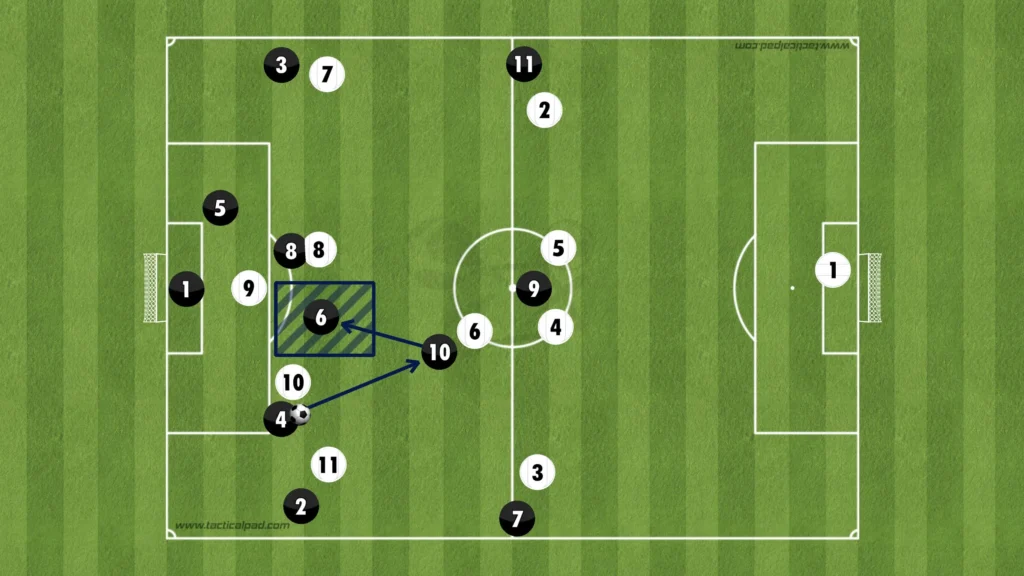
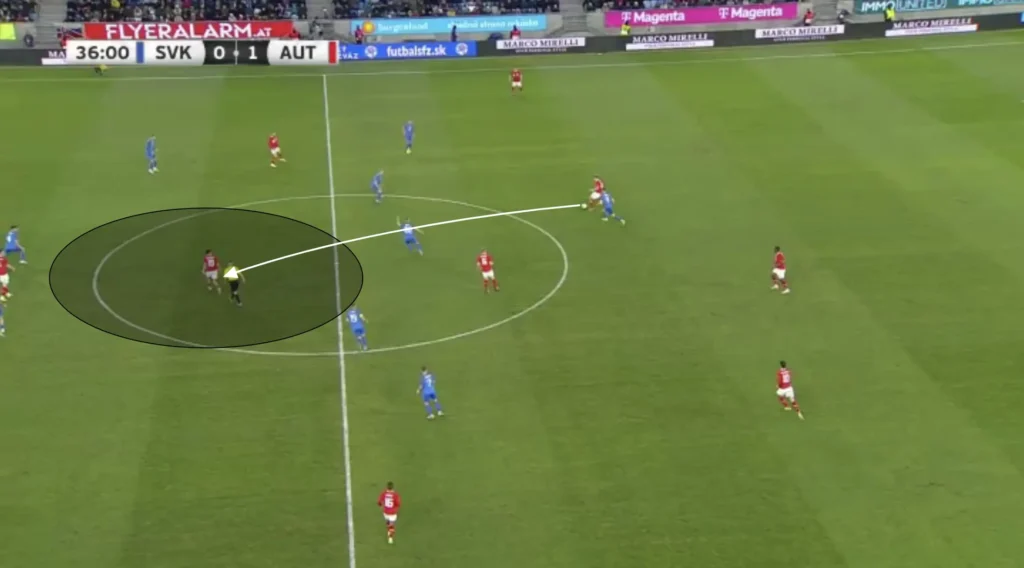
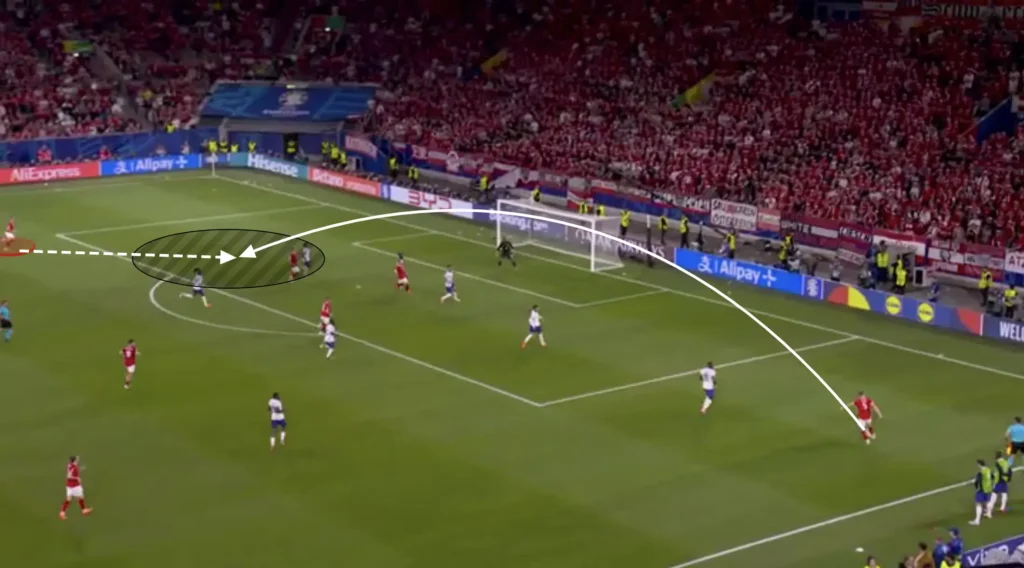
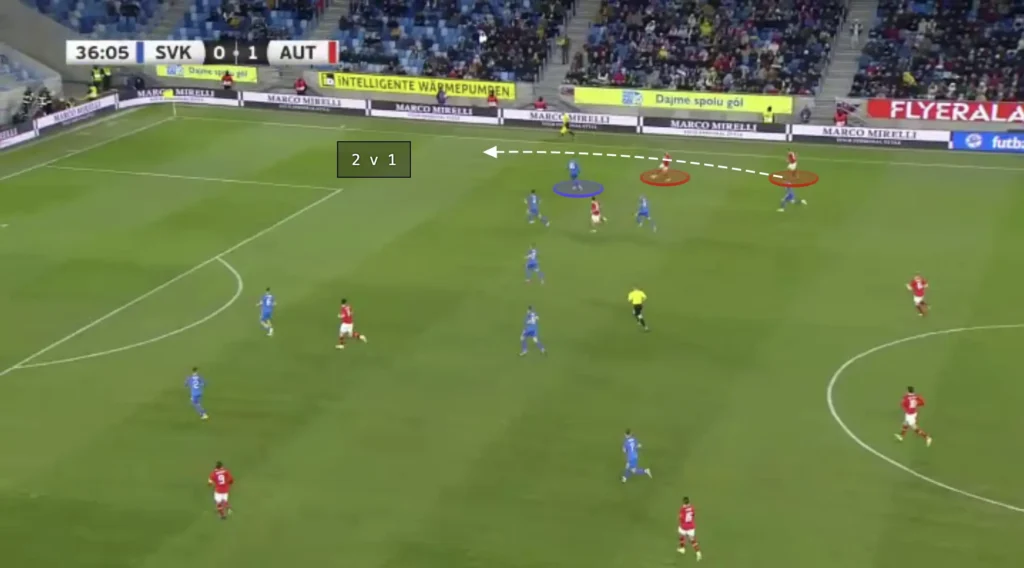
Counterattack
The 1-4-2-3-1 formation is highly effective for launching counterattacks due to its balanced structure and the presence of fast, creative players in advanced positions. When defending, the two holding midfielders provide a solid base, allowing the four attacking players—comprising the number-ten, two wingers, and a lone striker—to quickly transition from defense to attack. The wide midfielders can exploit spaces on the flanks, while the number-ten can link up play and deliver incisive passes to the forward. This setup creates multiple attacking options, making it difficult for the opposition to cover all threats and enabling swift, efficient counterattacks that can catch defenses off guard.
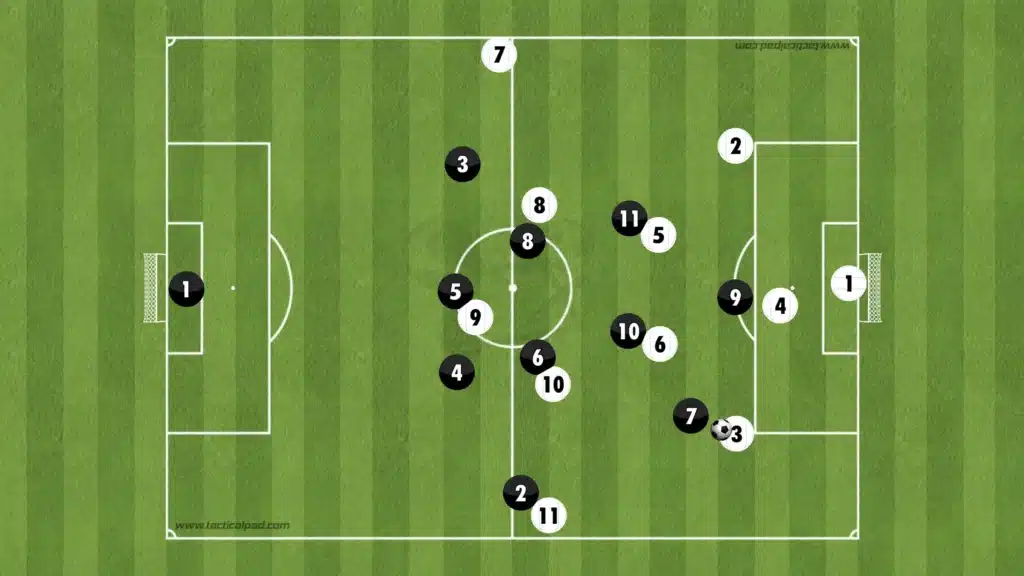
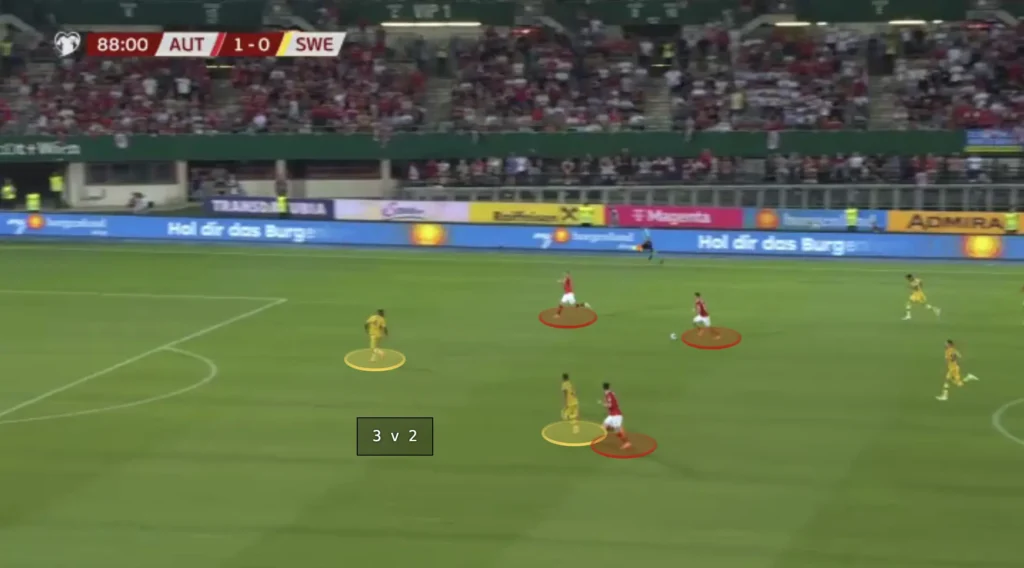
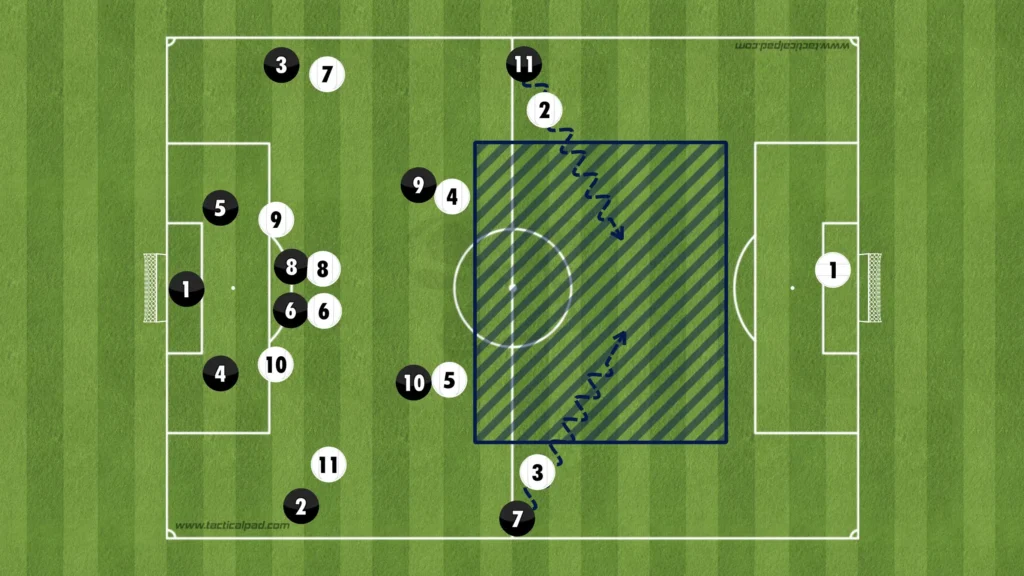
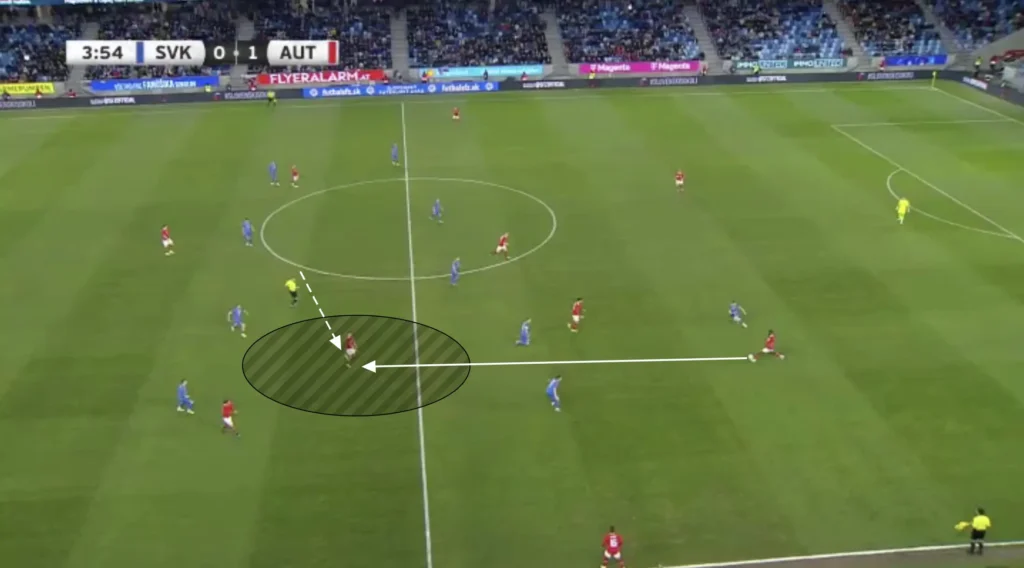
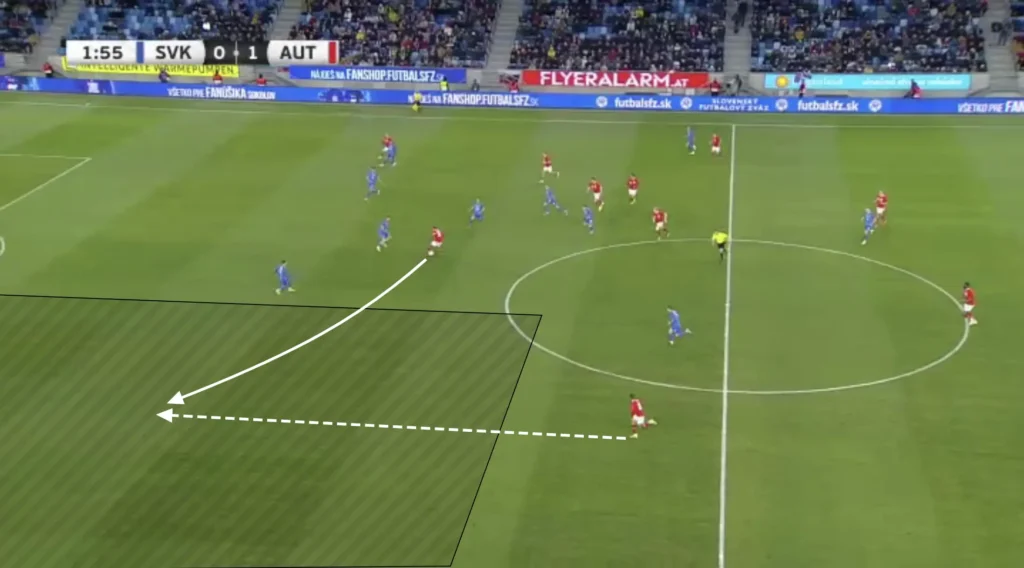
This is a counterattack from the Austrian national team, who play in a 1-4-2-3-1 formation, where the wingers and the striker combine to create a 3v2 counterattacking situation against two opposition defenders.
Build-up
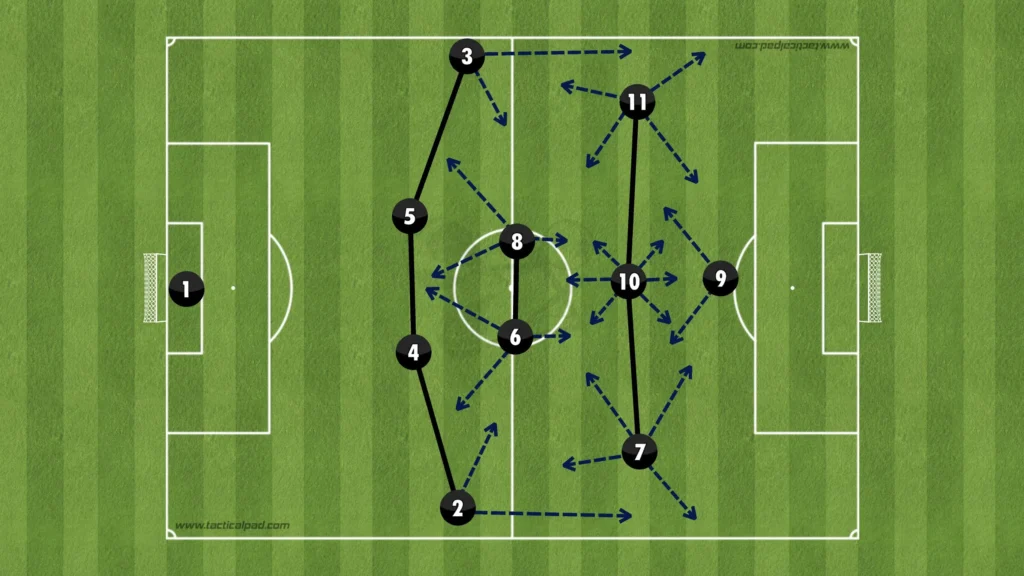
Building up in a 1-4-2-3-1 formation focuses on creating a stable and flexible structure to facilitate ball progression from defense to attack. The four defenders provide a solid backline, with the fullbacks often pushing up to offer width. The two holding midfielders play a crucial role, acting as a pivot to distribute the ball and shield the defense. The three attacking midfielders, positioned centrally and on the wings, aim to exploit spaces between the opposition’s lines, supporting the lone striker who leads the attack. This formation allows for versatility in passing options, with the team able to switch play, build through the center, or exploit wide areas, making it effective for controlling possession and launching varied attacking moves.
Low Build-up
The 1-4-2-3-1 formation offers a lot of flexibility in the low build-up. The wingers can play high and wide to stretch the opposition’s backline or come inside to be closer to the number-ten. The number-ten can drop centrally, to the side, or push up next to the striker. The holding midfielders can be close together or far apart to open up different passing lanes from the backline to the attacking midfield.
Low build-up while -1 in the forward line
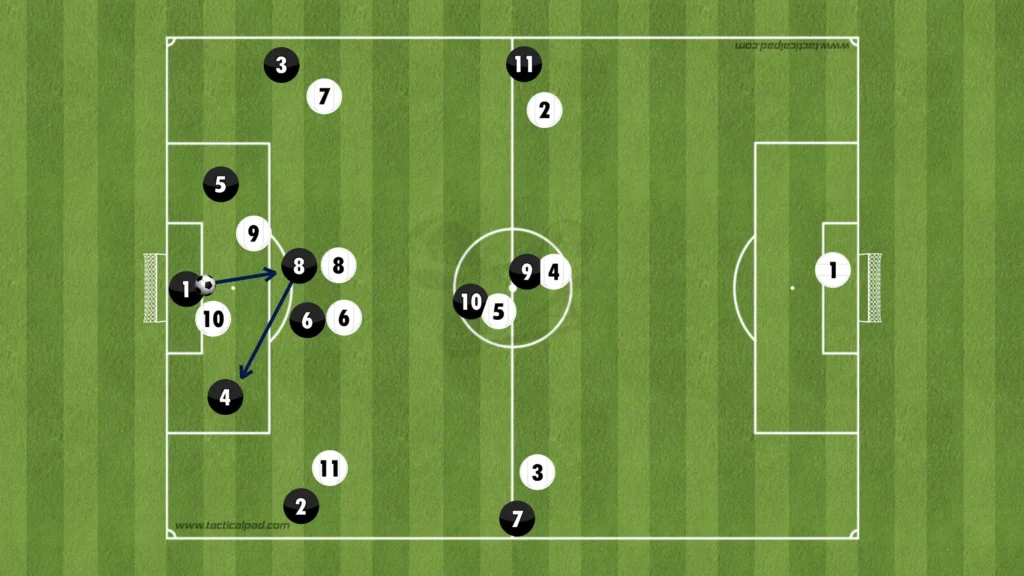
If the opposition comes up and presses with one striker and four defenders, there will be a numerical disadvantage up top but a numerical advantage at the back. The goalkeeper and center-backs can create a 3v1 against the opposition striker and use that numerical advantage to find a free center-back who can take the ball forward past the striker.
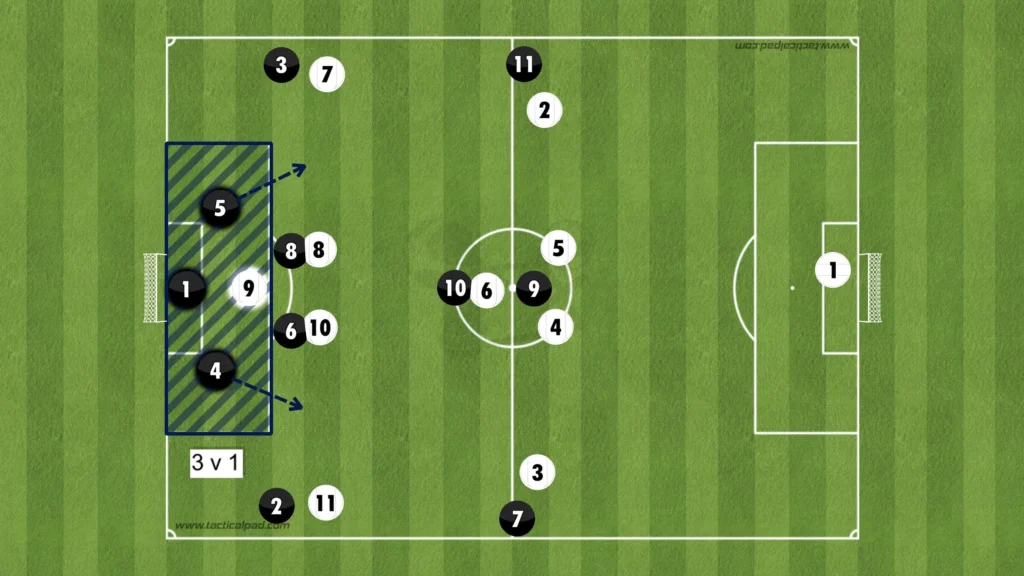
From there, the center-back will attract the press from a new opponent, which opens the space for a teammate. If the opposition winger pushes up to press the center-back, the fullback will be open, and a third-man combination involving the number-ten could be used to find him, killing the press. If an attacking midfielder pushes up to press, a holding midfielder will be open, and the number-ten could again be used as the third-man to find him.
Low build-up vs man-to-man system (numerical equality)
If the opposition comes up and presses man-to-man, there will be numerical equality all over the pitch. The only place where a numerical advantage could be made is in your own penalty area with the goalkeeper and center-backs against the opposition strikers.
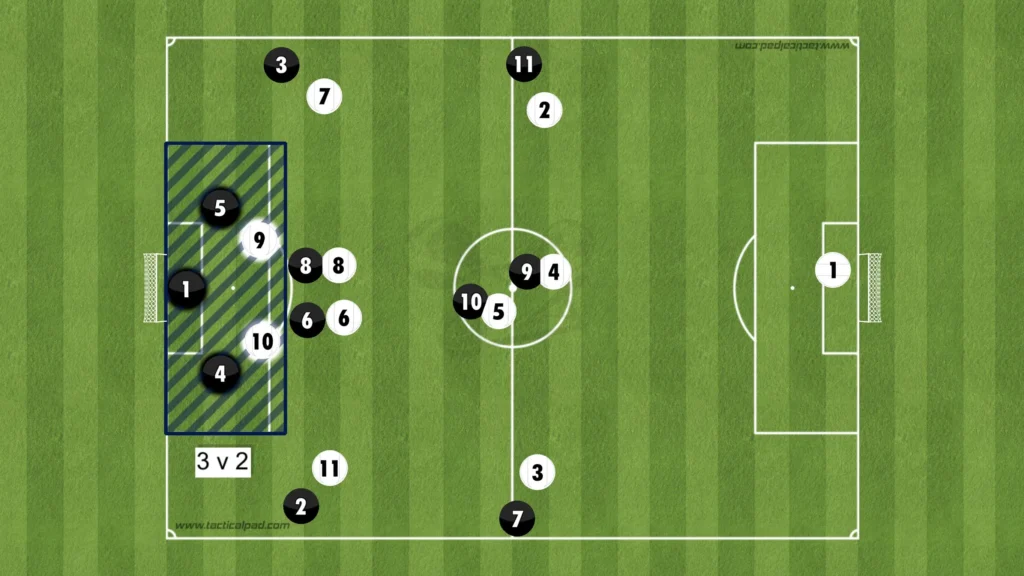
This 3v2 can be exploited to find a free center-back who can take the ball forward. Firstly, the center-back can play the ball to the goalkeeper who waits for one of the strikers to press him. This means the center-back the striker was marking will be free. The pressing striker will block the passing lane from the goalkeeper to the center-back, which means a third-man has to come and connect. The goalkeeper can play the ball to one of the holding midfielders, who can play a one-touch pass to the open center-back, beating the striker’s press.
From there, the center-back can take the ball forward and attract the press from a new opponent, which opens the space for a teammate. If the opposition winger pushes up to press the center-back, the fullback will be open, and a third-man combination involving the number-ten could be used to find him. If an attacking midfielder pushes up to press, a holding midfielder will be open, and the number-ten could again be used as the third-man to find him and kill the press.
Going long
Building up like this is great in theory but requires massive concentration, training, and technique. One bad pass or bad touch will lead to a certain goal. To avoid that risk, many teams go long when building up against a man-to-man system. The benefit of building in a 1-4-2-3-1 formation is that it can be manipulated with small movements to open up more space for the attackers, giving more threat to these long balls. If the number-ten moves to one side and the striker drops to the other side, the attacking team will be in a 1-4-2-2-2 formation with two number-tens and two high wingers in the low build-up.
This structure questions the opposition center-backs, forcing them to make difficult decisions. If they push up on the number-tens, the space behind them opens up, giving the winger a 1v1 against the fullback in a massive space.
However, if they do not push up, a numerical superiority is created in the midfield, allowing the attacking team to find the number-tens and play through the press.
Here, De Zerbi’s Brighton exploits the space in behind by playing a through-ball from the goalkeeper to the winger into the space that Brentford’s pushing center-backs have opened.
High Build-up
The 1-4-2-3-1 formation offers even more opportunities for flexibility in the high build-up. The wingers can play high and wide to stretch the opposition’s backline or come inside to create overloads in the middle. The number-ten can drop and pick up the ball from the backline or push up to be closer to the striker. A holding midfielder can drop into the backline, allowing the fullbacks to either push up or come into the midfield.
Finding the number-ten
The number-ten plays an important role in the 1-4-2-3-1 formation. Considering his advanced position, he will be the main person to find in the build-up. With the wingers and striker pinning the backline, the number-ten will often be able to turn when receiving the ball. When he gets the ball, he will be behind the opposition’s midfield, allowing him to drive at the defense and play decisive through-balls to the attackers.
Wingers coming in
In the 1-4-2-3-1 formation, the movement of the wingers plays a crucial role in creating tactical flexibility and attacking options. When wingers invert, they move from their wide positions into central areas. This movement allows them to link up with the central attacking midfielder and striker, creating overloads in the middle of the pitch. Additionally, inverting wingers can exploit the half-spaces between the opposition’s fullbacks and center-backs, making them more unpredictable and harder to mark. By inverting, wingers in the 1-4-2-3-1 formation contribute to a more dynamic and fluid attack, increasing their team’s chances of breaking down organized defenses.
Numerical Advantage in the Midfield
When the wingers come in, five players will be in the midfield, three attacking midfielders and two holding midfielders. With five central midfielders, you will always have a numerical advantage in the midfield. This means at least one midfielder will always be open. Having only the two fullbacks out wide and the rest in the middle creates more options in the center and less space between the players. Therefore, 1-4-2-3-1 playing teams, who invert the wingers, should prioritize playing through the middle. You will have one player out wide to pull the opposition apart while the rest create numerical advantages in the midfield areas. This builds good conditions in defensive transitions, allowing more players to counterpress when losing the ball.
Another purpose for keeping many players in the middle is to shorten the distance between them. This shortens the length of the passes, which naturally shortens the time between passes. This means the opposition players will have less time to push up and press, giving the players more time and control with the ball.
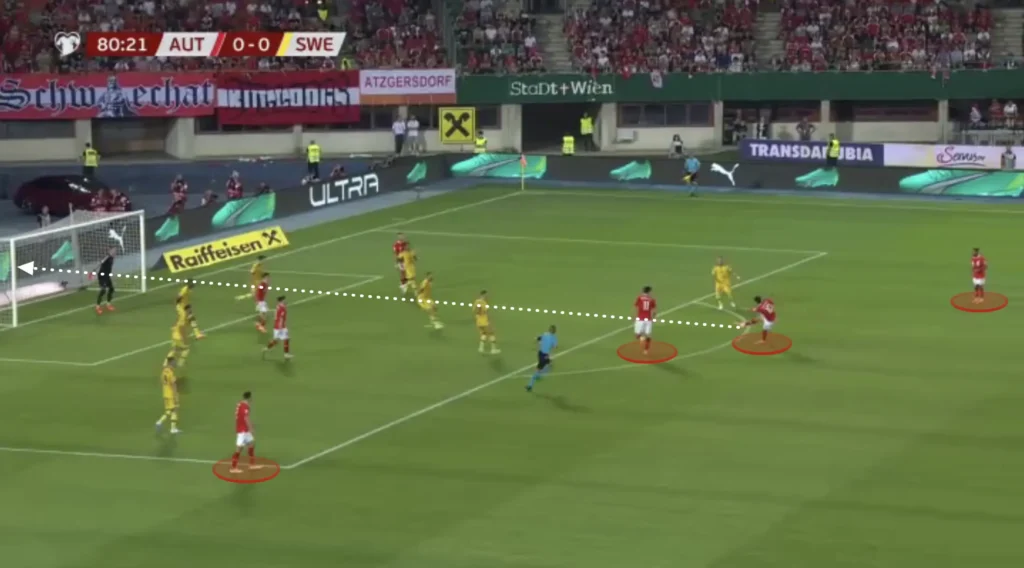
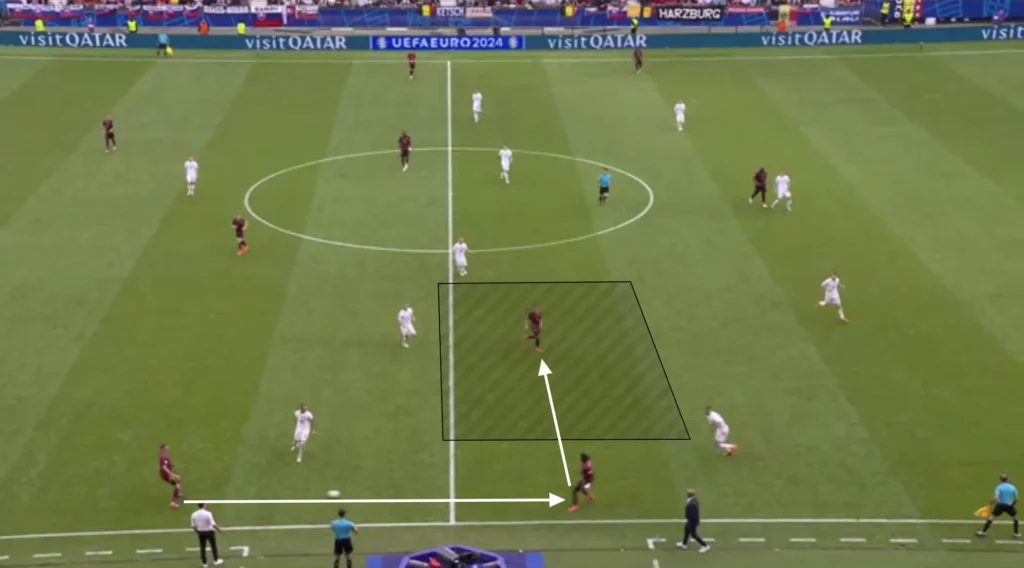
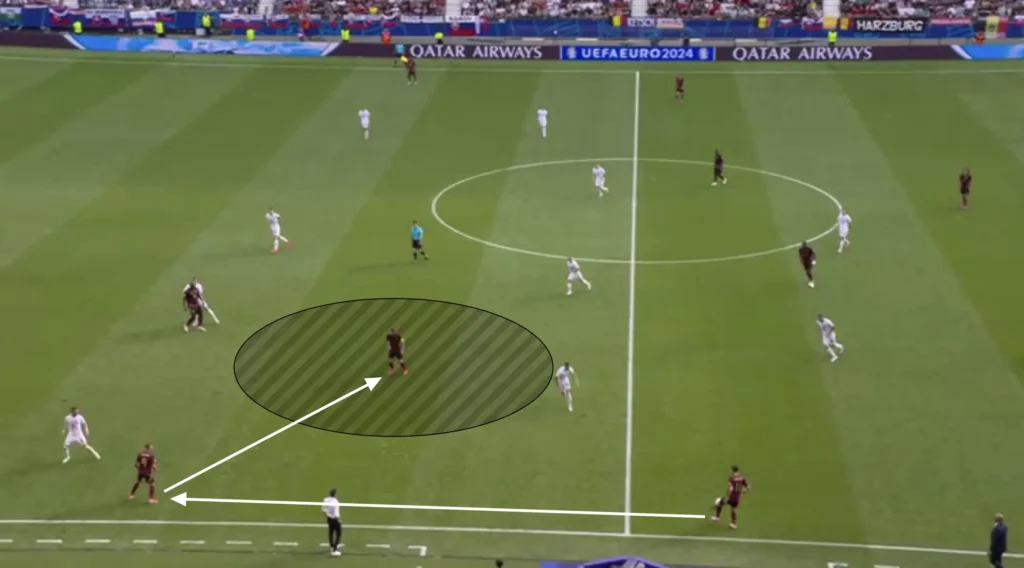
Fullbacks pushing up
The wingers coming in opens up space on the flanks for the fullbacks to push up, providing width and crossing opportunities. By pushing up the field, they stretch the opposition’s defensive line, creating more space for the number-ten and wingers to operate. This forward movement also forces the opposing wide players to track back, relieving pressure on the holding midfielders and allowing the team to maintain possession in advanced areas. Additionally, fullbacks in this formation often deliver crosses into the box, adding an extra dimension to the attack and increasing the chances of creating goal-scoring opportunities.
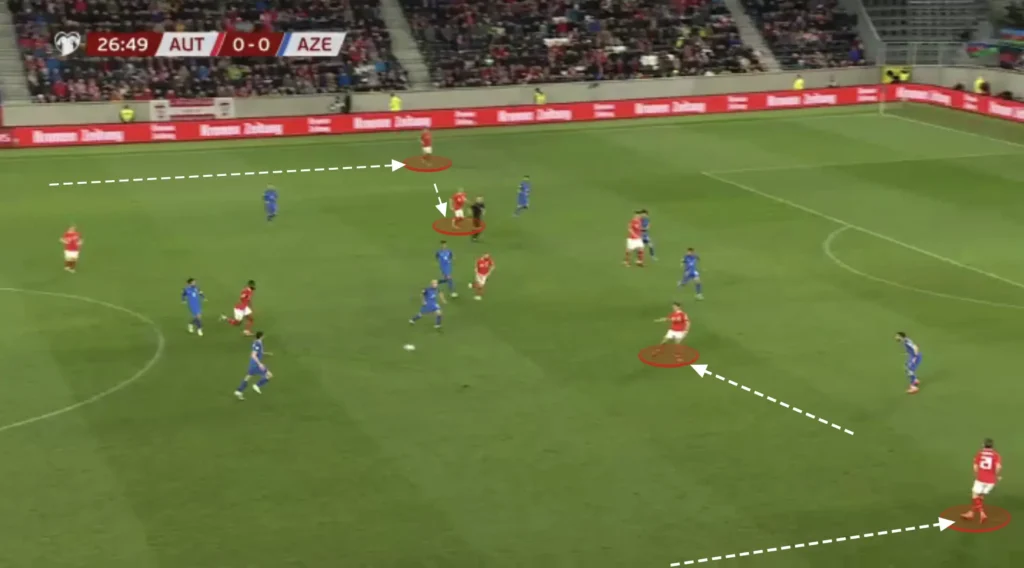
Here, Austria’s fullbacks push up and are found out wide in acres of space, allowing them to take the ball forward and deliver a cross.
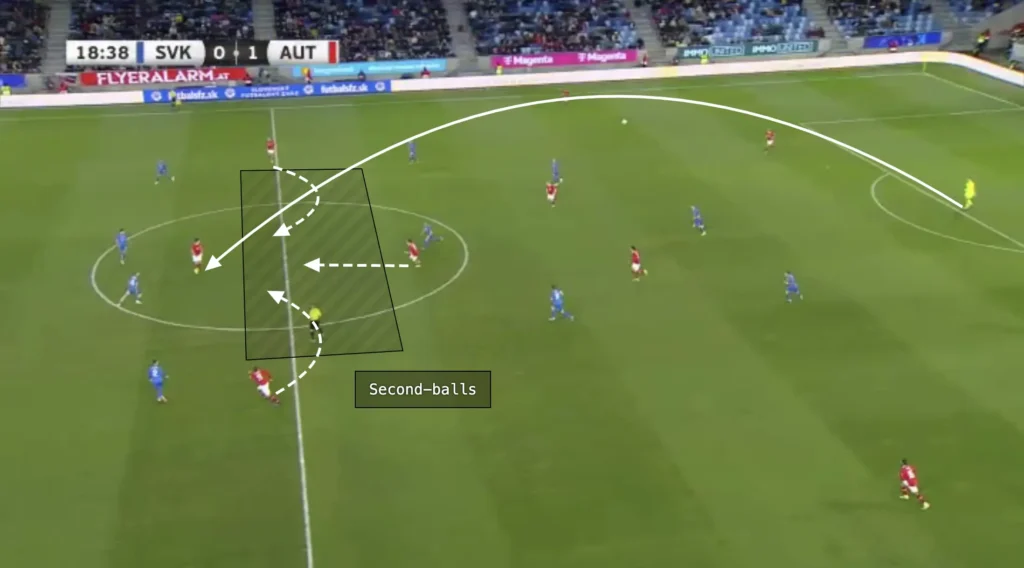
Second-balls
Having the three attacking midfielders close together means they can work together to win the second-balls. If a long ball comes, the attacking midfielders must get around their opponents and anticipate where the second ball will land when the long ball comes.
Many players high up the pitch
With the wingers coming in and the fullbacks pushing up, many players will naturally be high up the pitch in attack. Six players will be very high and can, for example, overload the box in crossing situations. The overloads in the box increase the chances of connecting with the cross, as more players present multiple targets for the crosser, making it harder for defenders to mark everyone effectively. Additionally, having multiple players in the box provides options for different types of finishes, whether it’s a header, volley, or a quick tap-in. It also allows for better positioning to react to second balls or rebounds, increasing the likelihood of capitalizing on any defensive errors.
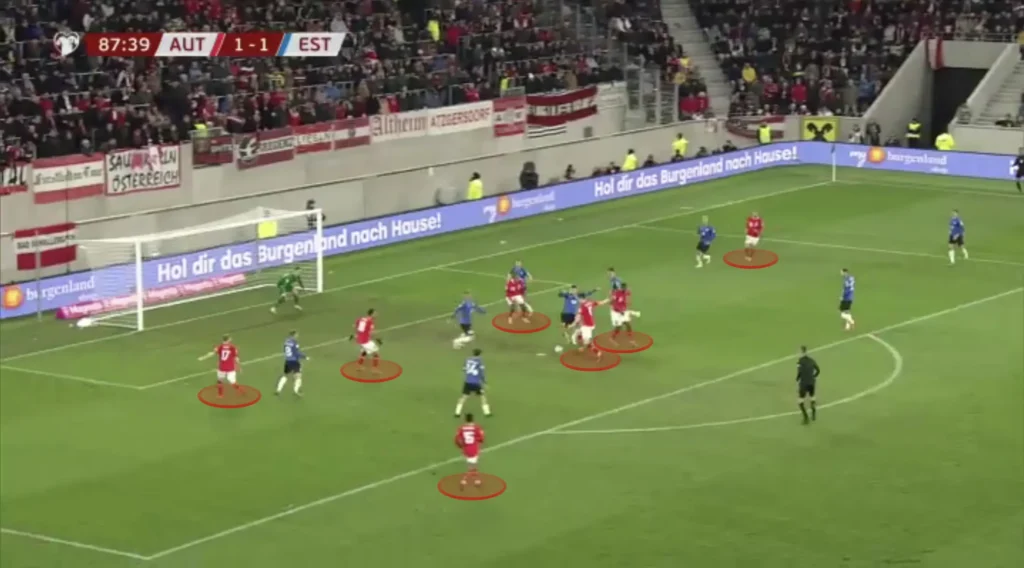
In the 1-4-2-3-1 formation, the attacking fullbacks can score many goals from crosses at the back post. The opposition fullback will often be preoccupied with an inverted winger, which leaves massive space at the back post for the fullback to attack. The fullback can be found directly or indirectly if no one else connects with the cross.
Additionally, the two holding midfielders will be outside the box, ready for the second balls and cut-backs. In crossing situations, the opposition’s defense usually drops down, which opens the space in front of the backline. The holding midfielders can pick up any second balls in these areas, and from there, they can shoot or combine with an attacker to create goalscoring opportunities.
Exposure to counterattacks
The 1-4-2-3-1 formation, while offering numerous attacking advantages, can leave a team vulnerable to counterattacks. With six players positioned high up the pitch—one striker, three attacking midfielders, and two fullbacks—there is often limited defensive cover, particularly if the team loses possession unexpectedly. The center-backs can find themselves outnumbered or isolated, especially if the holding midfielders are unable to provide adequate support. This exposure can lead to dangerous counterattacking situations for the opposition, who can exploit the open spaces left behind.
Wingers staying wide
In the 1-4-2-3-1 formation, the wingers can also stay wide, which stretches the opposition’s defense horizontally. By positioning themselves near the touchlines, they force the opposing fullbacks to cover more ground, creating gaps in the defensive line that the central attacking players can exploit. This width also provides valuable crossing opportunities, allowing the wingers to deliver balls into the box for the lone striker and advancing midfielders. Additionally, maintaining width helps to open up space in the midfield, giving the team’s playmakers more room to operate and facilitating quicker transitions from defense to attack.
2v1 against the opposition fullback
With the wingers staying wide, the attacking team will have two players on the wing. These two can work together to create chances, mainly by overloading the opposition fullback. When the winger gets the ball on the wing, the fullback can quickly make an overlap, creating a 2v1 against the opposition fullback. If the fullback drops to cover the overlapping run, the winger could cut inside, taking a shot or combining with a midfielder. If the fullback covers the center, the winger can easily play the ball to the overlapping fullback, creating a crossing opportunity.
Using third-man to find the number-ten
Staying wide with the wingers also gives the number-ten more space to operate in. The number-ten can move to the pockets and find space where it opens up. Different techniques can be used to find the number-ten in these spaces. A common way is to use the winger as the third-man. When the fullback has the ball, the winger can break away from his opponent, allowing the fullback to find him with a simple pass. The winger can play a one-touch pass into the number-ten between the lines, allowing the number-ten to drive and attack the defense.
Good conditions to defend counterattacks
With the wingers wide, the fullbacks will have less freedom to push up. On the one hand, this gives you fewer players high up the pitch, meaning creating goalscoring opportunities could become more difficult. On the other hand, this creates better conditions to defend against counterattacks. When fullbacks stay back, they are better positioned to cover the wide areas, which are often exploited during quick transitions. This positioning also allows them to support the center-backs, reducing the space that attackers can exploit and preventing overloads.
Final Thoughts
In conclusion, the 1-4-2-3-1 formation offers a balanced and versatile approach to modern football, providing both defensive solidity and attacking flexibility. Its structured pressing system, particularly in high and mid/low press scenarios, allows teams to control the game by limiting the opposition’s options and creating numerical advantages across the pitch. The formation’s adaptability in both build-up play and counterattacks ensures that teams can efficiently transition between defense and attack while maintaining a strong, compact shape.
However, the 1-4-2-3-1 is not without its challenges. The potential exposure to counterattacks, especially when fullbacks push up and many players are committed forward, requires careful management. Teams must balance the attacking benefits of the formation with the need to remain vigilant defensively, particularly against quick transitions from the opposition.
Overall, the 1-4-2-3-1 formation’s effectiveness lies in its ability to adapt to various tactical situations, making it a powerful tool for teams aiming to dominate both defensively and offensively. Understanding its intricacies can help players, coaches, and fans alike appreciate the strategic depth and flexibility it brings to the game.