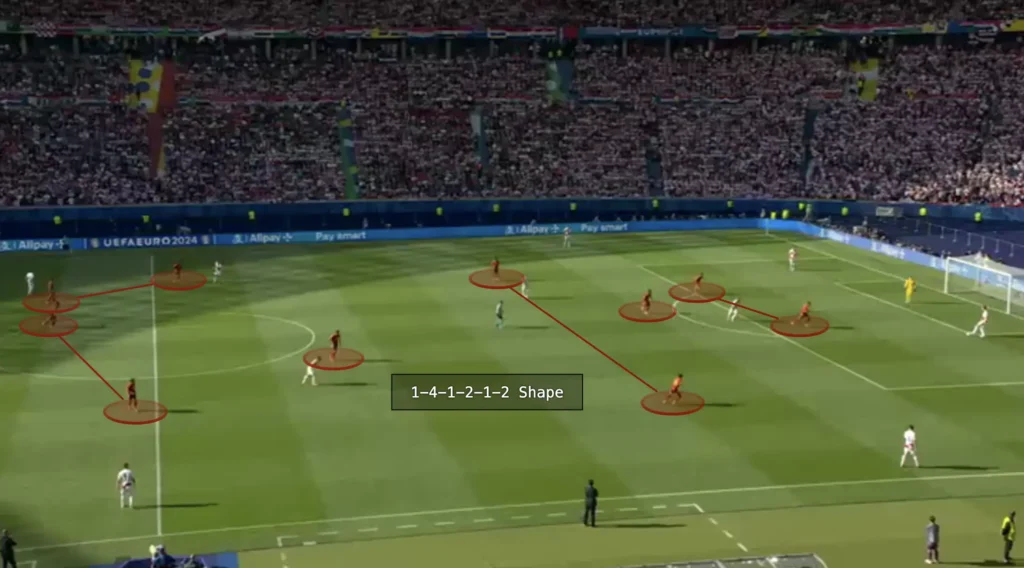
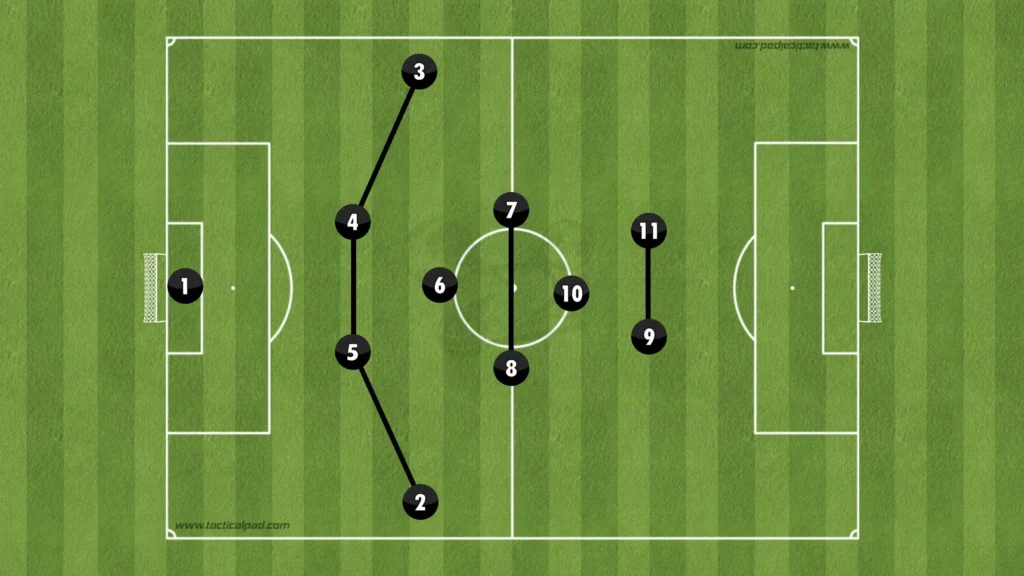
Understanding football formations is key to appreciating the strategies behind the beautiful game. This article will dive into the 1-4-1-2-1-2 formation, a versatile setup that balances defense and attack. This formation features a strong defensive line, a holding midfielder to break up opposition plays, two dynamic box-to-box midfielders, a creative number-ten in front of them, and a pair of forwards to spearhead the attack. Whether you’re a coach, player, or fan, exploring the intricacies of the 1-4-1-2-1-2 formation will enhance your tactical knowledge and game-day experience. Let’s break down how this formation operates and what its advantages are on the pitch. waht
High Pressing in the 1-4-1-2-1-2 formation
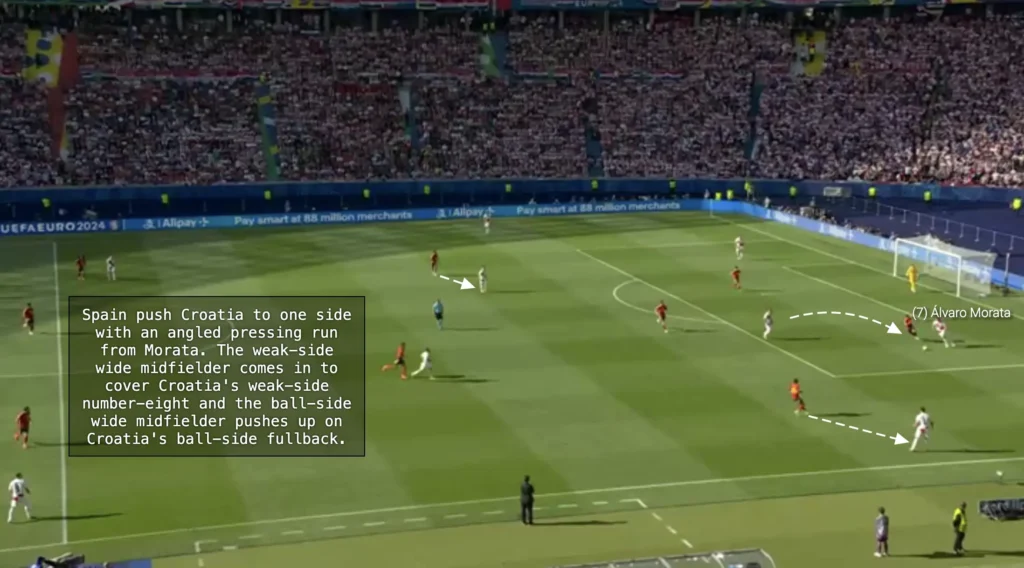
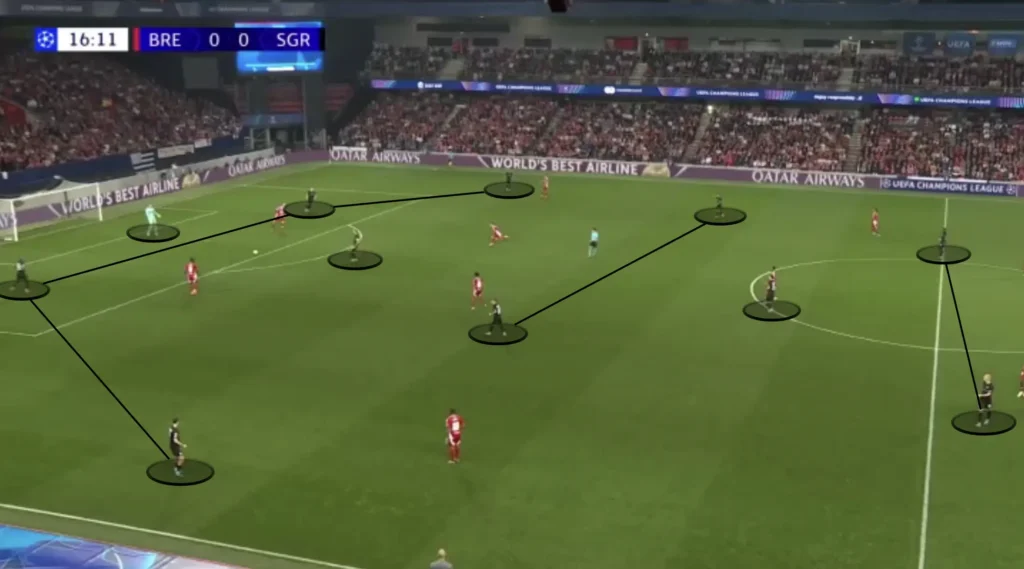
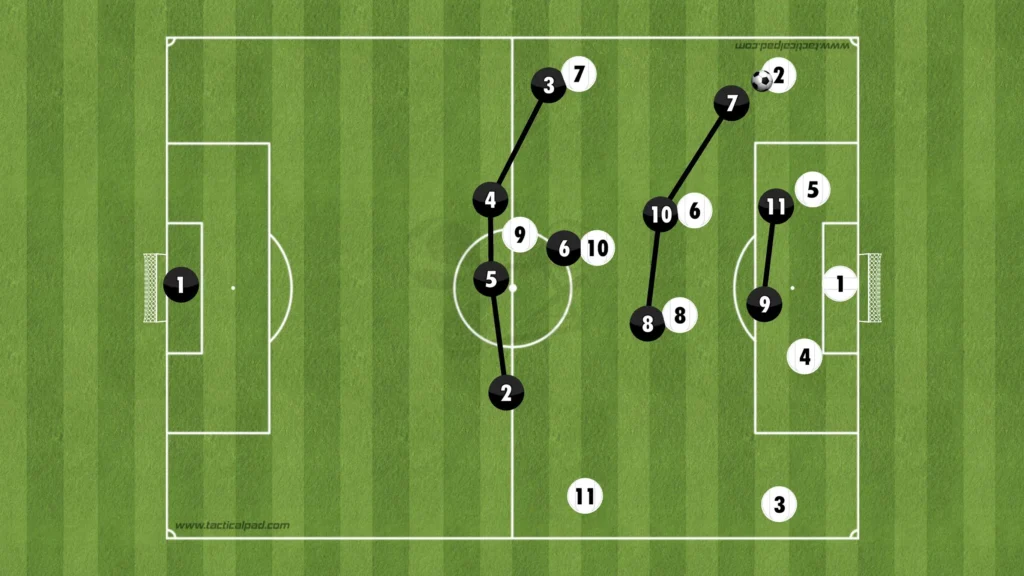
When pressing in the 1-4-1-2-1-2 formation, which often turns into a 1-4-1-3-2 formation when the number-eights push up, the main idea is to push the opposition to one side and leave the opposition defenders on the far side open. This is possible because the pass from one side to the other is too difficult for the ball-holder to make, and if he makes it, the players will have enough time to come across and win the ball. The benefit of this system is that it gives you a numerical advantage against the opposition striker/strikers, which gives you more control when defending long balls.
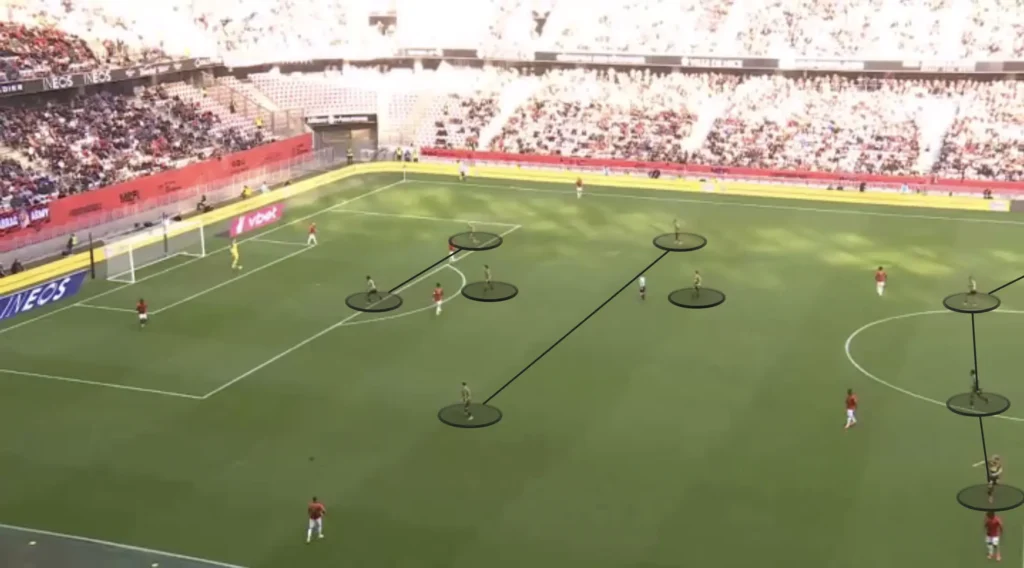
High press against a back four
Against a back four, the two strikers will be responsible for the two center-backs, and the two number-eights are the ones who have to move depending on where the ball is. If the ball is on the left side, the left midfielder has to come out to the opposition right-back, and the right midfielder tucks in. If the ball is on the right side, the right midfielder has to come out to the opposition left-back, and the left midfielder has to tuck in.
Pressing Against a 1-4-2-3-1
The ball-side number-eight pressures the opposition ball-side fullback, the number-ten comes across to the ball-side holding midfielder, and the far-side number-eight tucks in to control the opposition far-side holding midfielder.
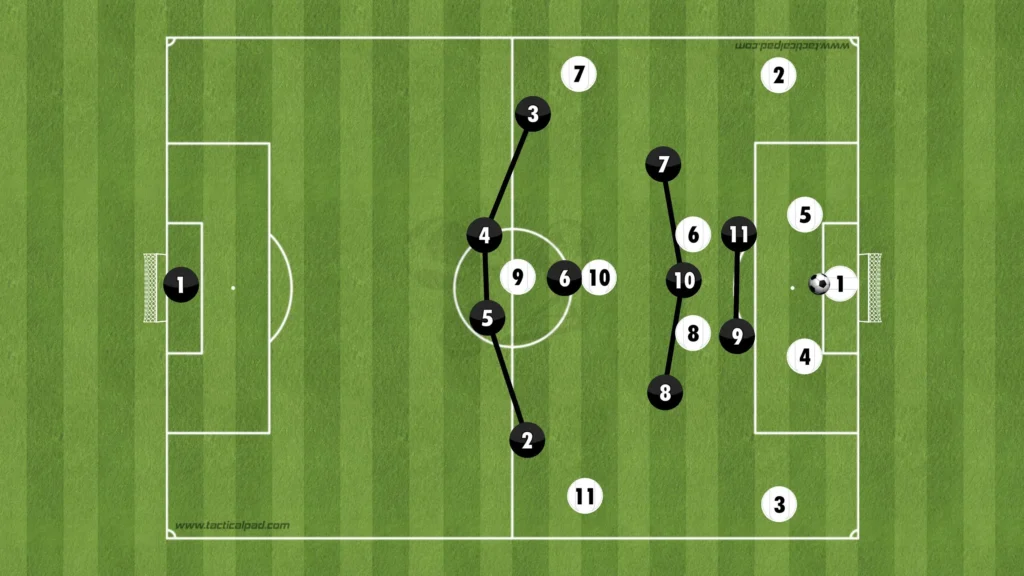
Pressing Against a 1-4-3-3
The ball-side number-eight pressures the opposition ball-side fullback, the holding midfielder pushes over on the opposition ball-side number-eight, and the far-side number-eight tucks in to control the opposition far-side number-eight.
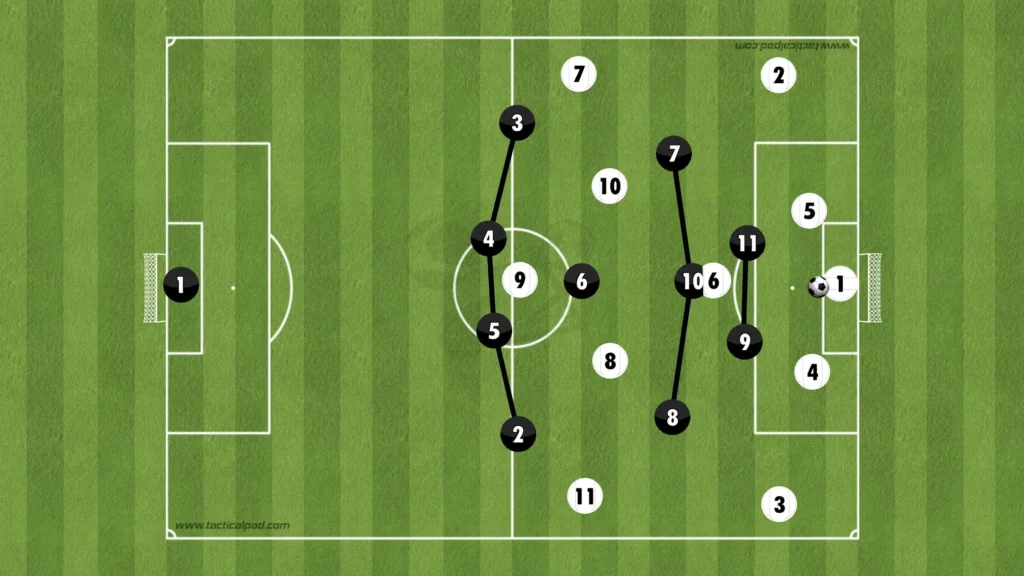
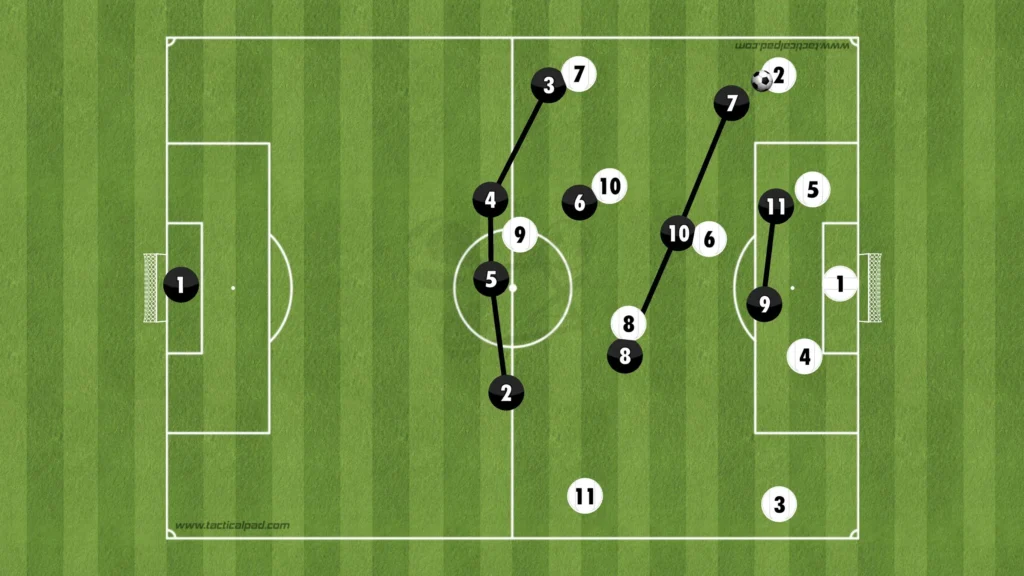
Spain pressed in a 1-4-1-2-1-2 formation during the Euros. Here, they win the ball high up against Croatia, who build in a 1-4-3-3 formation.
High press against a back three
Pressing against a back three works similarly to pressing against a back four. The idea here is again to push the opposition to one side and leave the other side open. The strikers are numerically inferior against the opposition backline, which means the far-side center-back has to be left open. The far-side striker closes the back-pass to the central center-back and the ball-side striker presses the ball-side center-back as hard as possible.
Issues with the switch of play
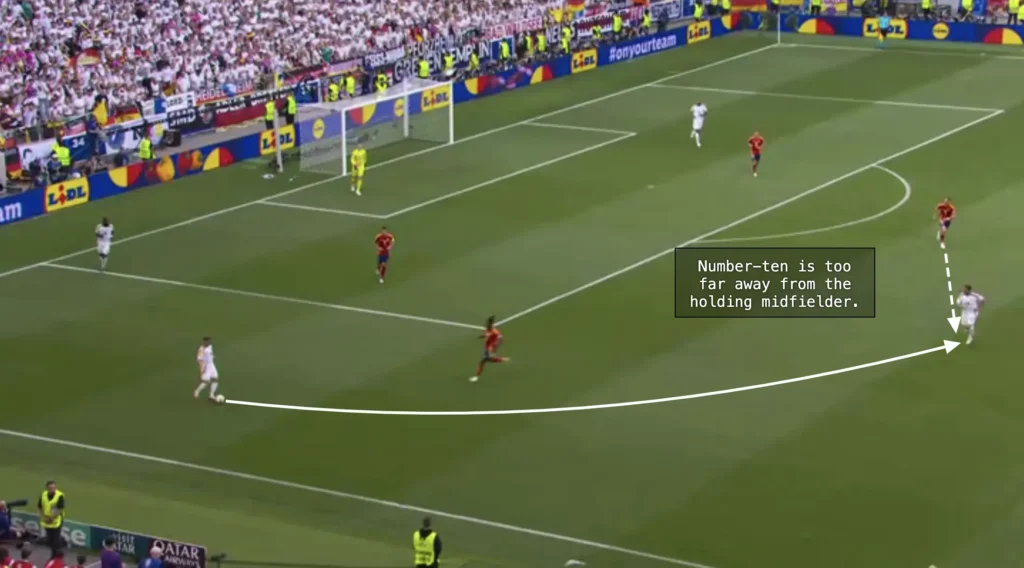
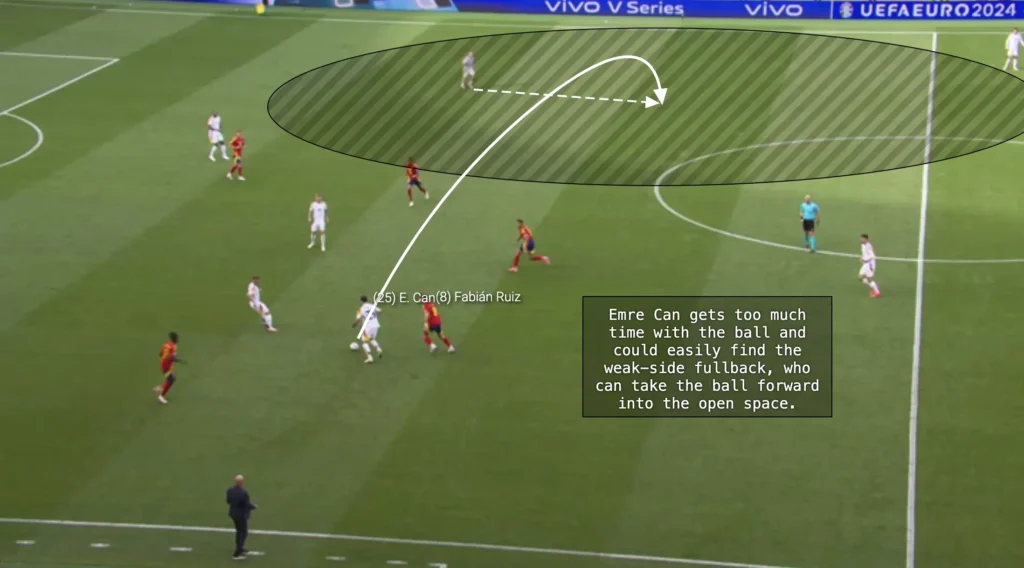
The most important thing when pressing in a 1-4-1-2-1-2 formation is to close the switch of play. If the ball gets switched from one fullback to the other, the two number-eights have to run way too far for the team to keep pressing the opposition. Therefore, the strikers have to force the ball to one side and then close the back pass to the center-backs. The midfielders also have to be very close to their opponents, not allowing them to turn and switch the play.
In this situation, Spain’s players are not aggressive enough and give too much space for Gremany’s midfielders. Emre Can can easily play out of the press by finding the German left-back with a switch of play.
Mid/Low Press
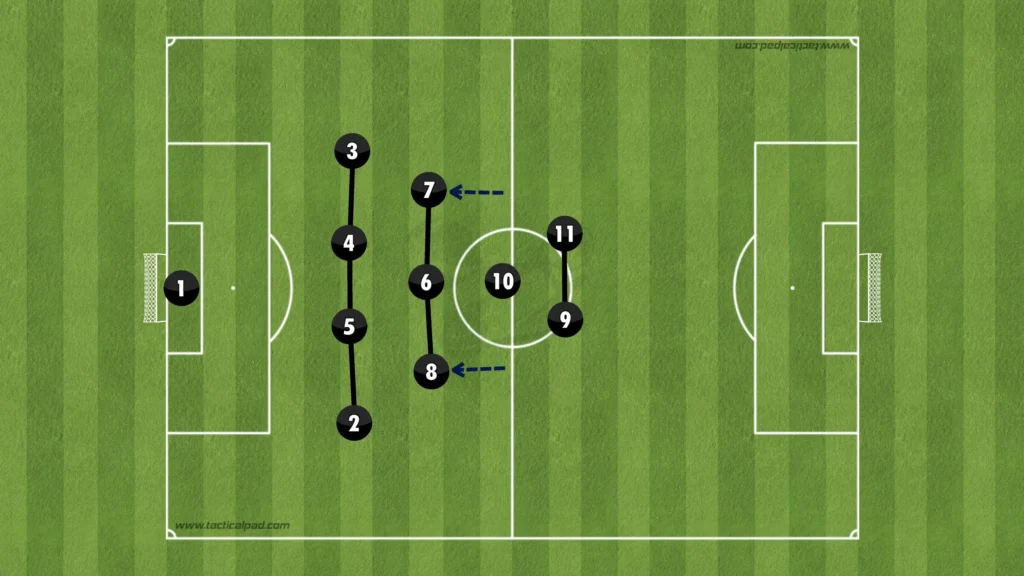
In the mid/low press, it is very dangerous to leave the number-six isolated without any horizontal cover. Therefore, the wise thing to do is to drop the number-eights down next to the number-six, creating a 1-4-3-1-2 formation.
Closing the center
The advantage of defending in this formation is that it naturally closes the center and forces the opposition out to the flanks. It blocks off most ways towards the goal and when staying compact, it is difficult to break down.
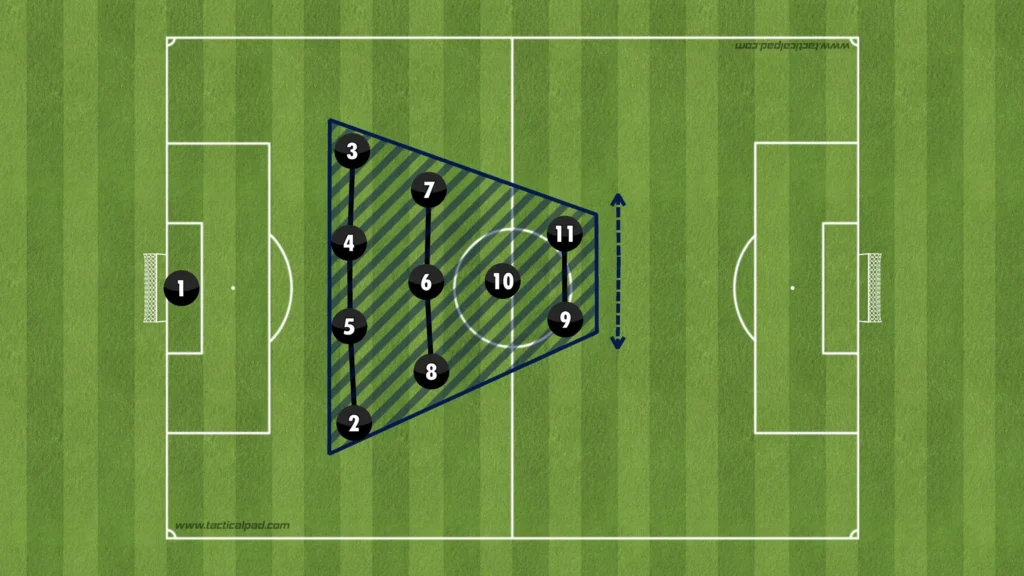
How to deal with wide advancements
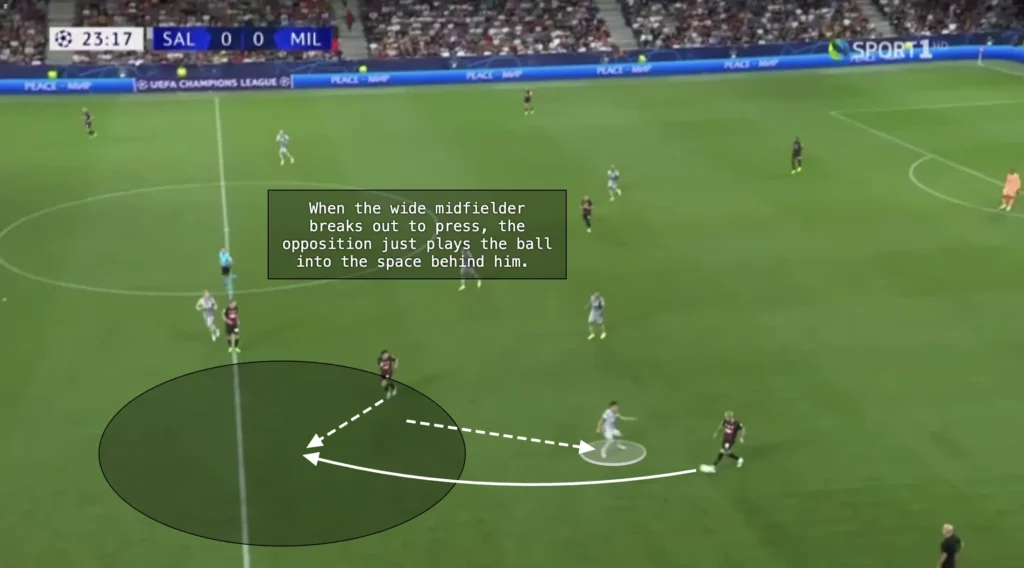
When the opposition progresses the ball on the wing, for example through a fullback, the ball-side central midfielder needs to break out and stop the fullback from advancing. Then, the other two central midfielders need to shift across to close the center. This often leaves big spaces on the other side. However, the long switch is difficult to play with control, and if they make it, the players will have enough time to come across and win the ball.
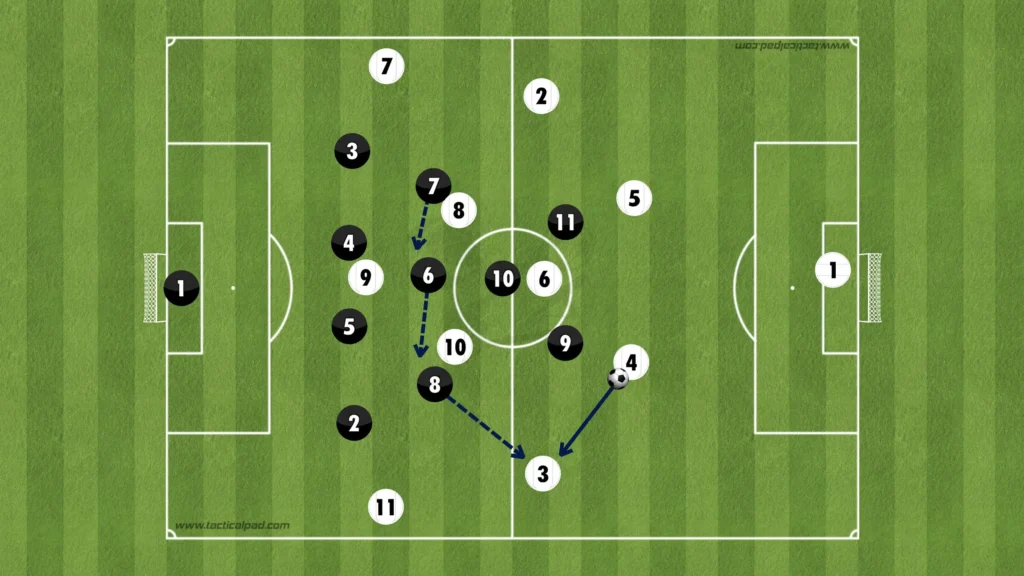
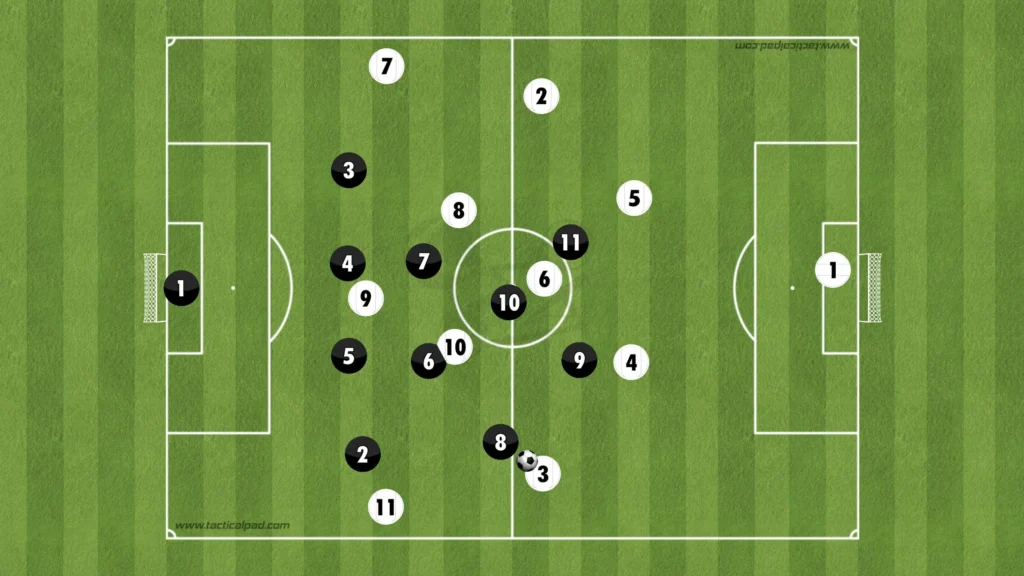
Problems with closing all spaces
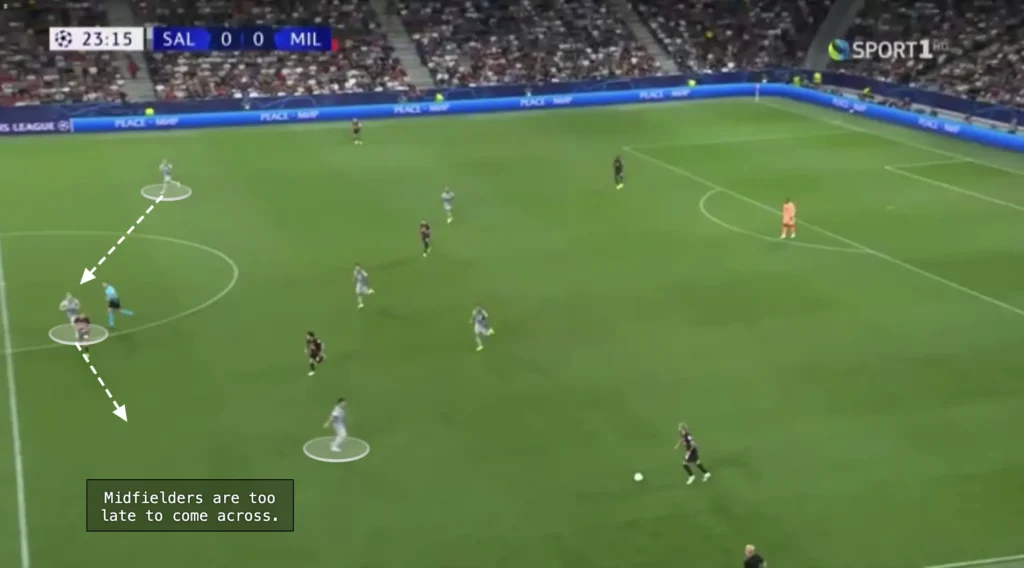
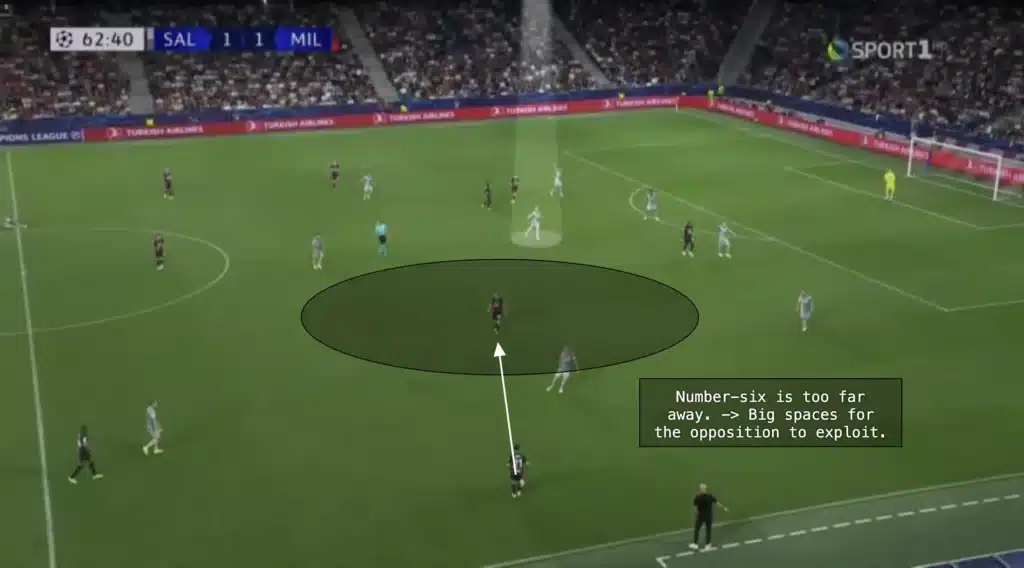
Like in the high press, a common problem with this formation is that it is difficult for the midfielders to come across and close all the spaces when the opposition switches sides. The three midfielders behind the number-ten have to quickly shift over to close the center and stay compact. If you are defending during big parts of the game, this can become tiring, the midfielders can’t come over as fast, and spaces may start to appear.
The next images show situations where the midfielders are too slow to come across and close the spaces in the midfield.
Counterattacking in the 1-4-1-2-1-2 Formation
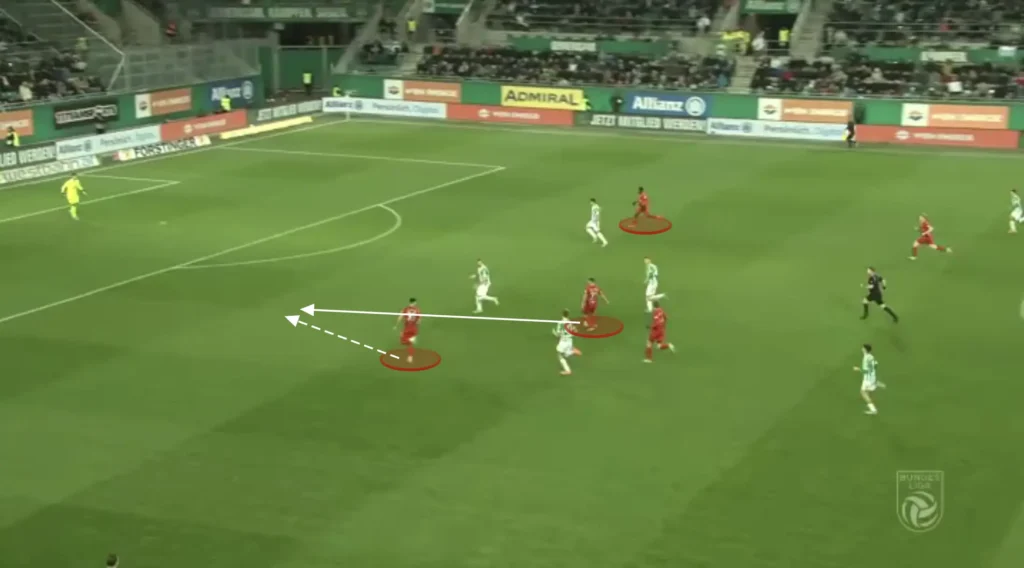
The 1-4-1-2-1-2 formation is particularly potent for counterattacks due to its two-striker setup and the support from the central midfielders. When the team regains possession, the strikers can quickly exploit the spaces behind the opposition’s defense, using their partnership to outmaneuver defenders. The number-ten, positioned just behind the strikers, can drive forward with the ball, creating opportunities for through balls and quick combinations.
This is a counterattack from RB Salzburg, who play in a 1-4-1-2-1-2 formation, where the number-ten and strikers combine to create a goalscoring opportunity.
Build-up in the 1-4-1-2-1-2 Formation
Building up in a 1-4-1-2-1-2 formation, also known as the diamond midfield, emphasizes control and progression through the central areas of the pitch. The shape naturally creates numerical superiority in midfield, with the holding midfielder providing a stable base for recycling possession and acting as a pivot. The two number-eights position themselves slightly wider, offering passing options to escape pressure, while the number-ten operates in the pockets between the opposition’s midfield and defense. Fullbacks play a crucial role in providing width, as the narrowness of the formation can leave the flanks exposed.
When building up, the team typically uses short, quick passes to progress through the thirds, relying on the holding midfielder and central defenders to dictate tempo and find vertical passes into midfield. This setup is ideal for teams that prioritize maintaining possession and breaking down defensive lines with central combinations, but it requires high technical quality and spatial awareness from all players to avoid being pressed into mistakes.
Numerical Advantage in the midfield
The 1-4-1-2-1-2 formation naturally creates numerical superiority in central areas during the build-up phase. With one defensive midfielder, two central midfielders, and an attacking midfielder, there will be four players in the midfield who can create numerical advantages in the central areas.
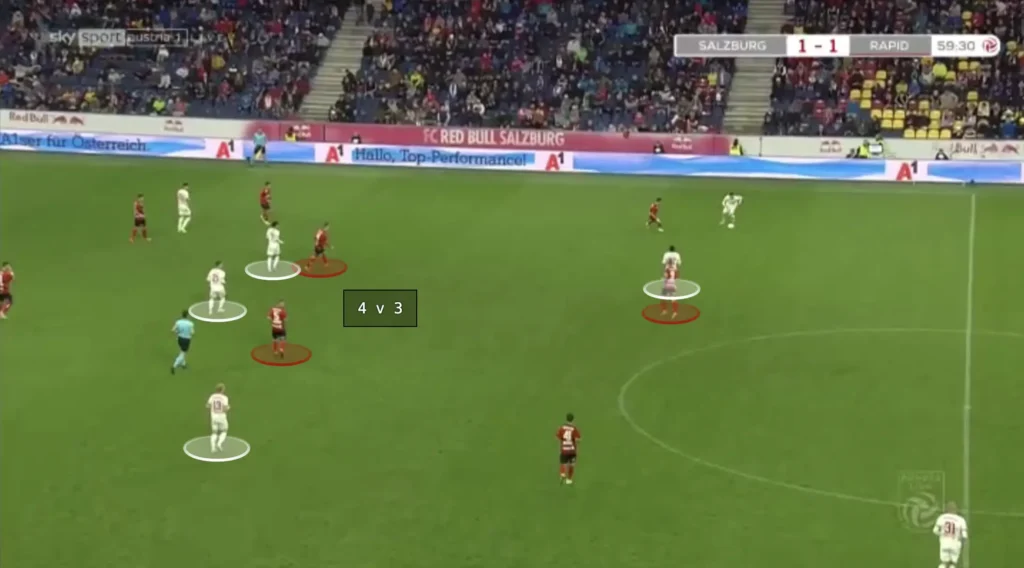
This shape makes it easier for the team in possession to progress the ball through the middle. Short, quick passing combinations exploit these overloads, while the strikers drop deeper if needed, adding more support and further overwhelming the opponent’s midfield structure. This numerical edge ensures control and dominance through the center of the pitch.
At the same time, having many players centrally builds good conditions in defensive transitions since it allows more players to counterpress when they lose the ball.
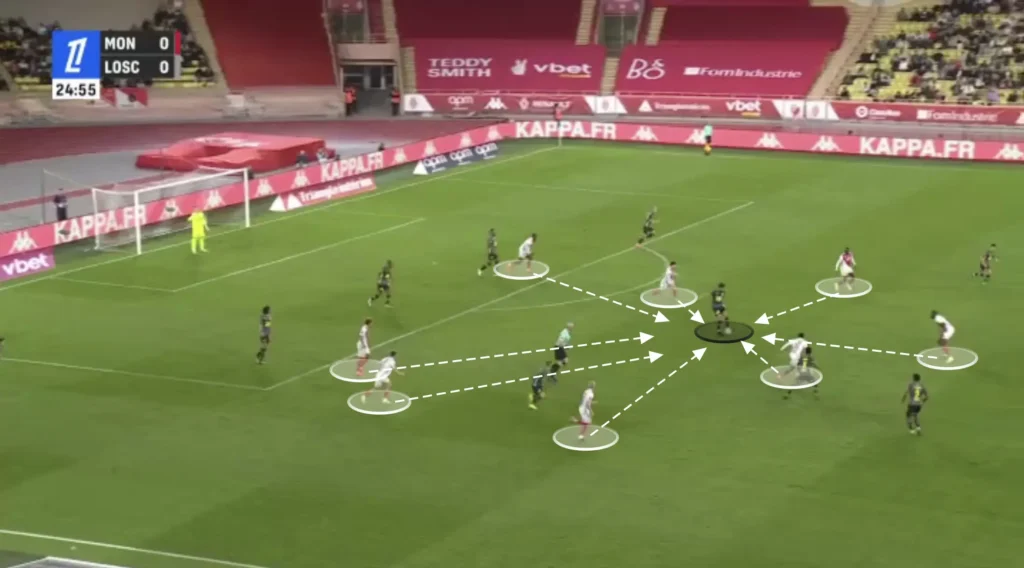
Another purpose for keeping many players in the middle is to shorten the distance between them. This shortens the length of the passes, which naturally shortens the time between passes. This means the opposition players will have less time to push up and press.
Strikers Between Defenders
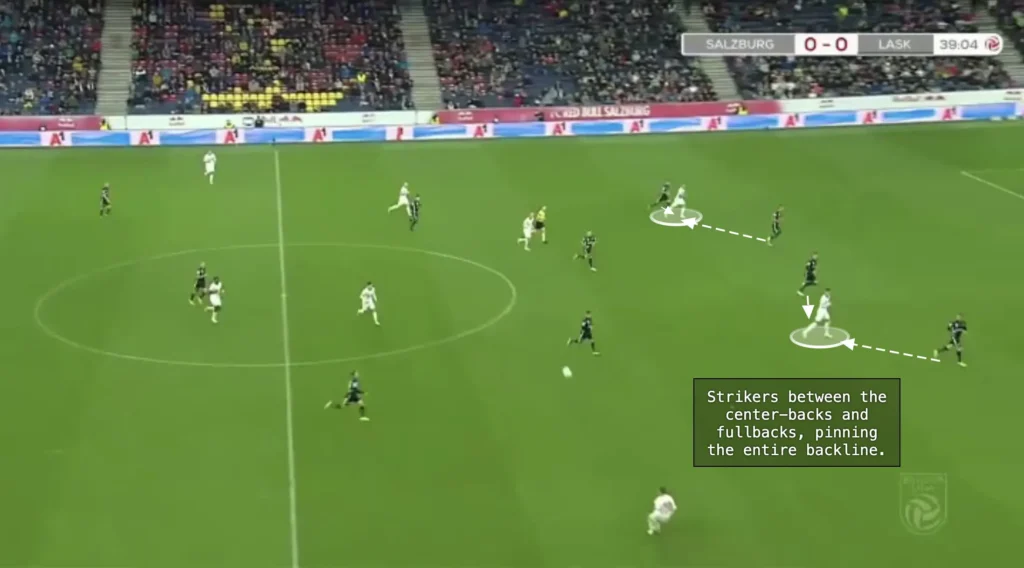
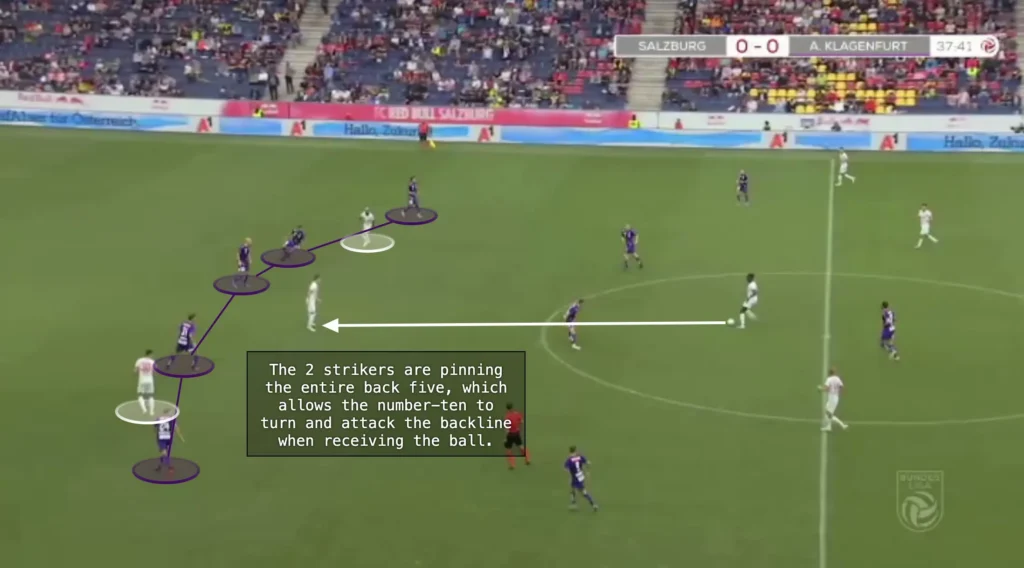
For the 1-4-1-2-1-2 formation to be used effectively, the strikers should always be positioned between the opposition defenders. When positioned between defenders and not on the defenders, they pin more opposition players and open up more space for the midfielders. Pinning means restricting the movement of the defenders. This tactic involves positioning oneself so that the defender is forced to stay close to the attacker, effectively “pinned” to a certain area of the field. By doing so, the attacker creates space elsewhere for their teammates.
Here, the pin means that the number-ten can turn and attack the defense when receiving the ball from the backline, without being pressured by the opposition defenders. The opposition defenders will not jump on the midfielders because they don’t want to leave any open spaces for the strikers. If the strikers stand on the defenders, only two defenders will be pinned. However, if the strikers stand between the defenders, they could pin the entire backline.
Against a back four
Against a back four, the strikers should stand between the fullback and the center-back. This makes it difficult for the defenders to push up without leaving too much space for the strikers and occupies the entire backline. With the entire opposition backline occupied, the midfielders and defenders will be in a +2 numerical advantage and have way more space.
Against a back five
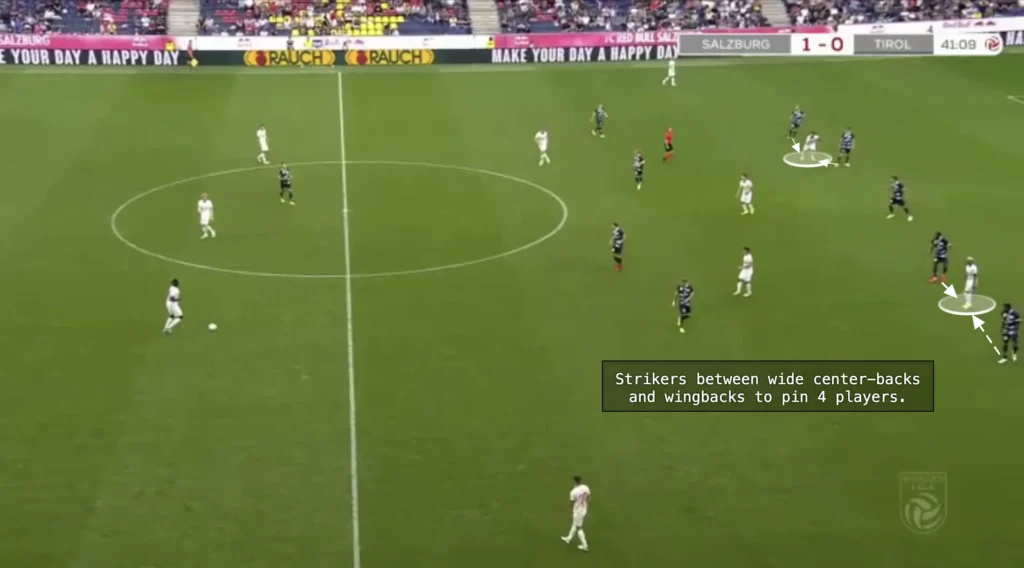
Against a back five, the strikers should stand between the wingback and the wide center-back. This pins these players, meaning four opposition defenders will not push up. The central center-back will be unoccupied, meaning he can push up and press. If he does this, however, a big hole opens up in the middle of the backline, which the strikers or attacking midfielders could run into to exploit.
Fullbacks wide to pull apart the midfield
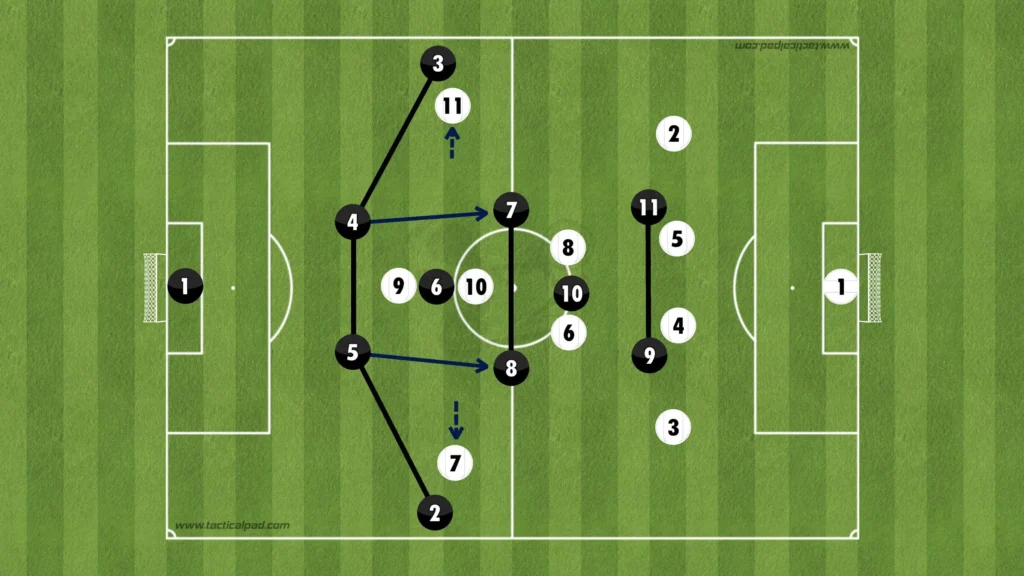
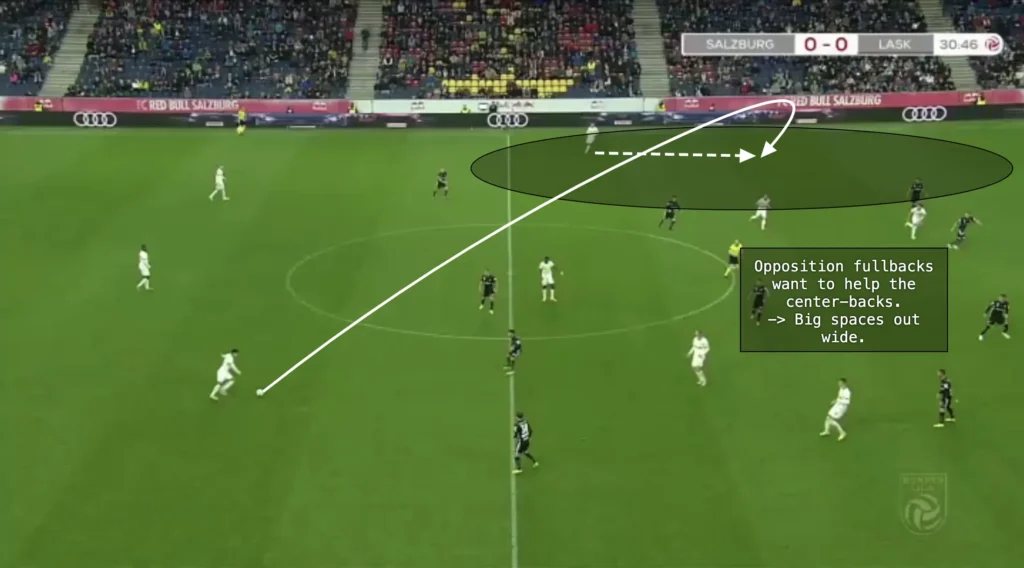
In a 1-4-1-2-1-2 formation, the fullbacks need to be very wide. This forces the opposition wingers to be wide, which pulls apart the opposition’s midfield. With big spaces between the opposition midfielders, the passing lanes from the center-backs to the midfield will be more open, which is important considering you want to play through the middle in this formation.
Finding the number-ten
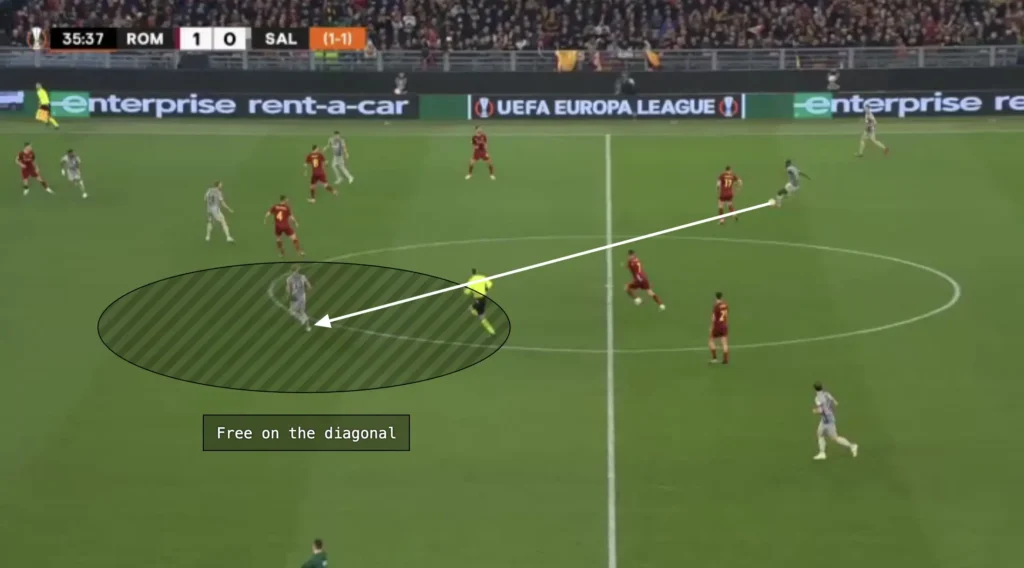
The number-ten plays an important role in the 1-4-1-2-1-2 formation. Considering his advanced position, he will be the main person to find in the build-up. With the strikers pinning the backline, the number-ten will often be able to turn when receiving the ball. When he gets the ball, he will be behind the opposition’s midfield, allowing him to drive at the defense and play decisive through-balls to the strikers.
Free player on the diagonal
Because of the danger of letting the number-ten receive the ball, many teams try to close that player off as much as possible. This opens the space for a different midfielder, usually the far-side number-eight. The diagonal pass from the backline to the far-side number-eight is often open and a great way to beat the opposition lines and progress the ball forward.
Fullbacks pushing up
In the 1-4-1-2-1-2 formation, the fullbacks play a vital role in providing width when attacking. With the midfielders operating narrowly, fullbacks push high up the pitch to stretch the opposition and create crossing opportunities. Their overlapping runs allow them to combine with the attackers, deliver crosses into the box, or draw defenders out of position. It also forces the opposing wide players to track back, relieving pressure on the midfielders and allowing the team to maintain possession in advanced areas.
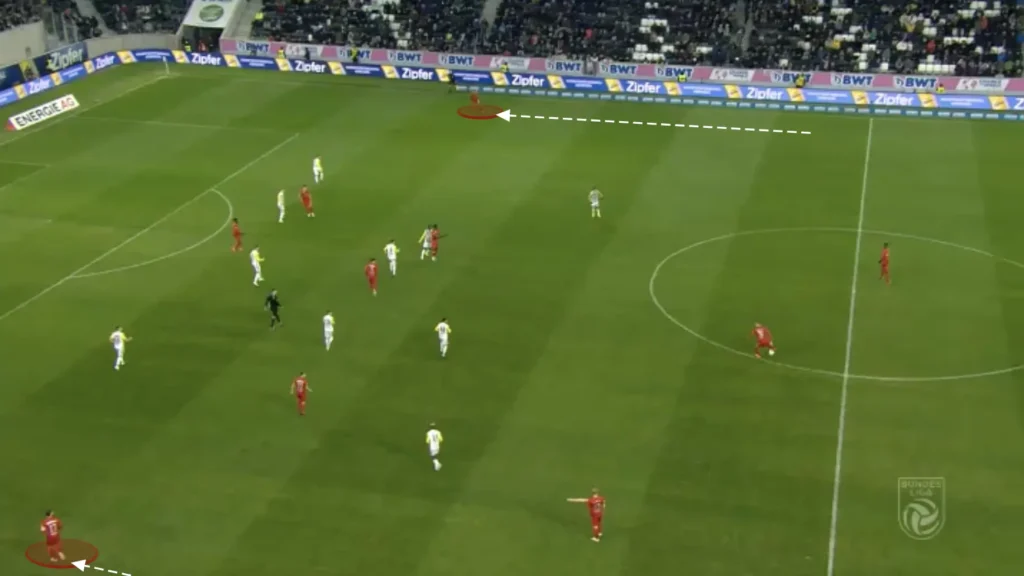
The fullbacks can often be found in the spaces outside the opposition defense with through-balls from the midfield or backline. From this position, they will have enough time and space to take the ball forward and cross it into the attackers in the box.
Exposure to counterattacks
The 1-4-1-2-1-2 formation, while offering numerous attacking advantages, can leave a team vulnerable to counterattacks. With the fullbacks positioned high up the pitch, there is often limited defensive cover, particularly if the team loses possession unexpectedly. The center-backs can find themselves outnumbered or isolated, especially if the defensive midfielder is unable to provide adequate support. This exposure can lead to dangerous counterattacking situations for the opposition, who can create numerical advantages and exploit the open spaces left behind.
Final Thoughts
The 1-4-1-2-1-2 formation offers a dynamic approach to both defense and attack, with its structure allowing for flexibility and fluidity on the pitch. By understanding how to press effectively, manage build-ups, and execute counterattacks, teams can leverage the strengths of this formation to dominate their opponents. However, like any tactical setup, it comes with its challenges, particularly in managing transitions and maintaining defensive solidity during counterattacks. Mastering the intricacies of the 1-4-1-2-1-2 can provide a strategic edge, making it a valuable formation for teams seeking to control the game and exploit their opponent’s weaknesses.

